Latest Movie :
Recent Tricks
Showing posts with label Blogger widgets. Show all posts

How to add contact form in blogger blogs easily

you have to only follow these steps to add contact form.
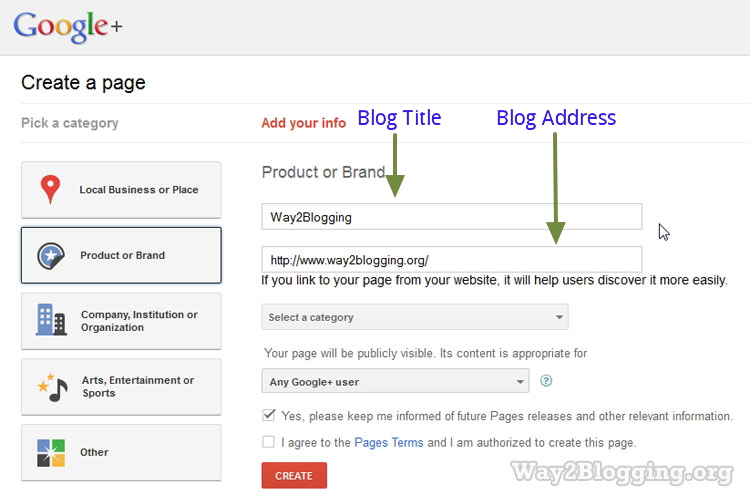
1. Go to Blogger.com → Blog Title → Layout → Add Widget
2.  From the tabs menu click on More Gadgets.
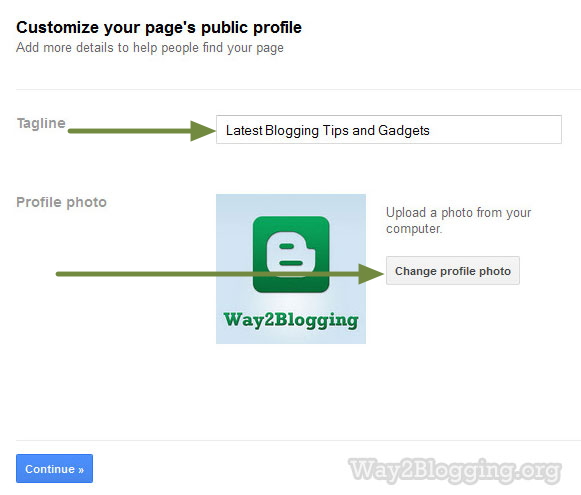
3. Now click on Contact Form and finally Give your desired heading to it
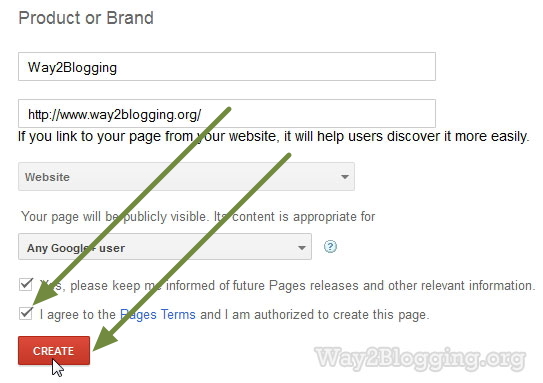
4. Save the widget and lastly save the Template


How to add Contact Form


Thats it. Now whenever a visitor wants to contact you he can do the same by just press a single button moreover you can see the messages in your email box. Now there would be no need of 123forms and Foxyforms. This contact form is in its initial stage and we may see further development on it.

I think you found this post useful , if it is then please keep looking in our website www.bloggingtrainings.blogspot.com.

Facebook Popup like box widgets for blogger and for website

To day i am going to provide you some beautiful facebook popup like box widgets for blogger and for your website. you can easily embed this code in your html page.Well here i am making a Facebook like popup box for blogger which is also nice to install.When you install it it and when someone visit you any blog page it will display on the front which ask you to like the page and its very simple and clean.

Here is screenshot of this widget

1


So you have to do these steps to install it on your blogger blog


          1.  Go to blogger dashboard  >  Layout
          2.  Now click on  >  Add a gadget
          3.  A box will appear select  >  HTML/Java Script box by scrolling until you find it
          4.  Now paste this code into the box and click on  >  Save


Remember, At end of this code you will find mbgadget  words replace it with your own fb like page username.

2


So this new gadget looks like this


So you have to remember in this code you have to find mbgadget and replace it with your Facebook username. 

So here is the more info about this box:

So now i am explaining the every part of this widget which is only for blogger blog. so here it is,
If we look that this box is very easy to install on any kind of blogger blogs, you just have to copy the code and paste it into the HTML gadget to the inside section of blog.
Its not very difficult to do so, You don't need to edit any type of template code to add this gadget it very easy to install.
Well while looking at the structure of the box then this box is more better then ever. Its very simple and clean you can easily understand that what type of this box is, Its normal display the like button of your facebook page it bring more likes.

This widget bring attention to your facebook fan page to like it and get updates from the fan page, if your blog is better and bring much better results and traffic then its good for you to add it up.

As i think this is one of the most powerful way to increase your fan page likes, if you have a little blog on blogger then you have to add this on your blog, its really boost your likes of fan page. Its simple work that, a visitor come to your website because of your brilliant content and if he really impress then he like your page.
Please keep watching our website and keep downloading and getting instructions from my website if you have any problem you may contact me. 0323-7591466, keep visiting my website www.bloggingtrainings.blogspot.com.

Floating Facebook Like Box Widget For Blogger


In This Post i will show you how to add a Floating Facebook Like Box Widget For Blogger. 
This will Floating Facebook Button when to move your cursor on it it pop out with stylish floating facebook like box. This widget can help you to increase facebook likes. You just need to our small code to your blogger blog. Currently this widget is only for Bloggeer/Blogspotblogs.

 
  1. Go to Design > Page Elements.
  2. Click Add A Gadget.
  3. Select HTML/Javascript .
  4. Paste the following code inside it,
<script type="text/javascript"> /*<![CDATA[*/ jQuery(document).ready(function() {jQuery(".abtlikebox").hover(function() {jQuery(this).stop().animate({right: "0"}, "medium");}, function() {jQuery(this).stop().animate({right: "-250"}, "medium");}, 500);}); /*]]>*/ </script> <style type="text/css"> .abtlikebox{background: url("http://4.bp.blogspot.com/-mMtB2ANqowQ/T6es-PuSR2I/AAAAAAAAAjM/LDamrUnMJJc/s320/fb1-right.png") no-repeat scroll left center transparent !important; float: right;height: 270px;padding: 0 5px 0 46px;width: 245px;z-index: 99999;position:fixed;right:-250px;top:20%;} .abtlikebox div{ padding: 0; margin-right:-8px; border:4px solid #3b5998; background:#fafafa;} .abtlikebox span{bottom: 4px;font: 8px "lucida grande",tahoma,verdana,arial,sans-serif;position: absolute;right: 6px;text-align: right;z-index: 99999;} .abtlikebox span a{color: gray;text-decoration:none;} .abtlikebox span a:hover{text-decoration:underline;} } </style> <div class="abtlikebox" style=""> <div> <iframe src="http://www.facebook.com/plugins/likebox.php?href=http%3A%2F%2Ffacebook.com%2Fallbloggertools1&amp;width=245&amp;colorscheme=light&amp;show_faces=true&amp;border_color=white&amp;connections=9&amp;stream=false&amp;header=false&amp;height=270" scrolling="no" frameborder="0" scrolling="no" style="border: white; overflow: hidden; height: 270px; width: 245px;background:#fafafa;"></iframe><span>Widget by :<a href="http://all-blogger-tools.blogspot.com">blogger widget</a></span> </div> </div>

5. Replace allbloggertools1 With Your Facebook Page Username
We have great collection of Best tricks and tutorials, Bloggingtrainings.blogpsot.com is a Blog Providing with Blogger widgets, help, blogger tips, blogger tricks, hacks, Blogger Gadgets,Plugins and Blogger resources with great skills and templates.practical SEO Tips and all things Blogging,is about Blog tricks & tips, Traffic generation, Backlinks, Search engine optimization, Web designing, E money, Social media, Facebook tricks,Blogging Discussion, Tips & Tricks,logging tips, tricks, how-tos, news, tools and resources, bloggingtrainings.blogspot presented in easy to understand tutorials.Keep visiting us if any links is not working or you want sme more help, then keep looging at bloggingtrainings.blogspot.com.or contact us 0323-7591466.


Add Floating Share Buttons Widget For Blogger Blogspot


This widget will allow your visitors to share your blog posts on social networks such as google+, facebook, twitter ...

The design is very attractive widget with animation from top to bottom and encourages readers to share your article easily by clicking on one of these buttons.
we spend now to install this widget


  • Go To Blogger > Design
  • Choose a HTML/JavaScript widget
  • Paste the following code inside it,
  • <style>
  • /*-------All Blogger Tools------------*/
  • #floatdiv {
  • position:absolute;
  • width:94px;
  • height:229px;
  • top:0;
  • left:0;
  • z-index:100
  • }

  • #mbtsidebar {
  • border:1px solid #ddd;
  • padding-left:5px;
  • position:relative;
  • height:220px;
  • width:55px;
  • margin:0 0 0 5px;
  • }
  • </style>


  • <div id="floatdiv">
  • <div id="mbtsidebar">
  • <table cellpadding="1px" cellspacing="0">
  • <tr>
  • <td style="border-bottom: 1px solid #E8E8E8; padding:5px 0 2px 0;">
  • <div id="fb-root"></div><script src="http://connect.facebook.net/en_US/all.js#xfbml=1"></script><fb:like href="" send="false" layout="box_count" show_faces="false" font=""></fb:like>
  • </td>
  • </tr>
  • <tr>
  • <td style="border-bottom: 1px solid #E8E8E8; padding:5px 0px;">
  • <g:plusone size="Tall" expr:href="data:post.url">
  • </g:plusone></td>
  • </tr>
  • <tr>
  • <td style="border-bottom: 0px solid #E8E8E8; padding:5px 0 0px 0;">
  • <a href="http://twitter.com/share" class="twitter-share-button" data-count="vertical" data-via="allbloggertool1">Tweet</a><script type="text/javascript" src="http://platform.twitter.com/widgets.js"></script>
  • </td>
  • </tr>
  • <tr>
  • <td style="border-bottom: 0px solid #E8E8E8; padding:0px 0 0px 0;">
  • <p style=" font-size:10px; text-align:center; color:#ddd;"><a style="color:#ddd;" href="http://all-blogger-tools.blogspot.com/" target="_blank">Widgets</a></p>
  • </td>
  • </tr>
  • </table>
  • </div>
  • </div>
  • <script type="text/javascript">
  • // JavaScript Document

  • <!--
  • /* Script by: www.jtricks.com
  • * Version: 20071017
  • * Latest version:
  • * www.jtricks.com/javascript/navigation/floating.html
  • */
  • var floatingMenuId = 'floatdiv';
  • var floatingMenu =
  • {
  • targetX: 0,
  • targetY: 300,
  • hasInner: typeof(window.innerWidth) == 'number',
  • hasElement: typeof(document.documentElement) == 'object'
  • && typeof(document.documentElement.clientWidth) == 'number',
  • menu:
  • document.getElementById
  • ? document.getElementById(floatingMenuId)
  • : document.all
  • ? document.all[floatingMenuId]
  • : document.layers[floatingMenuId]
  • };
  • floatingMenu.move = function ()
  • {
  • floatingMenu.menu.style.left = floatingMenu.nextX + 'px';
  • floatingMenu.menu.style.top = floatingMenu.nextY + 'px';
  • }
  • floatingMenu.computeShifts = function ()
  • {
  • var de = document.documentElement;
  • floatingMenu.shiftX =
  • floatingMenu.hasInner
  • ? pageXOffset
  • : floatingMenu.hasElement
  • ? de.scrollLeft
  • : document.body.scrollLeft;
  • if (floatingMenu.targetX < 0)
  • {
  • floatingMenu.shiftX +=
  • floatingMenu.hasElement
  • ? de.clientWidth
  • : document.body.clientWidth;
  • }
  • floatingMenu.shiftY =
  • floatingMenu.hasInner
  • ? pageYOffset
  • : floatingMenu.hasElement
  • ? de.scrollTop
  • : document.body.scrollTop;
  • if (floatingMenu.targetY < 0)
  • {
  • if (floatingMenu.hasElement && floatingMenu.hasInner)
  • {
  • // Handle Opera 8 problems
  • floatingMenu.shiftY +=
  • de.clientHeight > window.innerHeight
  • ? window.innerHeight
  • : de.clientHeight
  • }
  • else
  • {
  • floatingMenu.shiftY +=
  • floatingMenu.hasElement
  • ? de.clientHeight
  • : document.body.clientHeight;
  • }
  • }
  • }
  • floatingMenu.calculateCornerX = function()
  • {
  • if (floatingMenu.targetX != 'center')
  • return floatingMenu.shiftX + floatingMenu.targetX;
  • var width = parseInt(floatingMenu.menu.offsetWidth);
  • var cornerX =
  • floatingMenu.hasElement
  • ? (floatingMenu.hasInner
  • ? pageXOffset
  • : document.documentElement.scrollLeft) +
  • (document.documentElement.clientWidth - width)/2
  • : document.body.scrollLeft +
  • (document.body.clientWidth - width)/2;
  • return cornerX;
  • };
  • floatingMenu.calculateCornerY = function()
  • {
  • if (floatingMenu.targetY != 'center')
  • return floatingMenu.shiftY + floatingMenu.targetY;
  • var height = parseInt(floatingMenu.menu.offsetHeight);
  • // Handle Opera 8 problems
  • var clientHeight =
  • floatingMenu.hasElement && floatingMenu.hasInner
  • && document.documentElement.clientHeight
  • > window.innerHeight
  • ? window.innerHeight
  • : document.documentElement.clientHeight
  • var cornerY =
  • floatingMenu.hasElement
  • ? (floatingMenu.hasInner
  • ? pageYOffset
  • : document.documentElement.scrollTop) +
  • (clientHeight - height)/2
  • : document.body.scrollTop +
  • (document.body.clientHeight - height)/2;
  • return cornerY;
  • };
  • floatingMenu.doFloat = function()
  • {
  • // Check if reference to menu was lost due
  • // to ajax manipuations
  • if (!floatingMenu.menu)
  • {
  • menu = document.getElementById
  • ? document.getElementById(floatingMenuId)
  • : document.all
  • ? document.all[floatingMenuId]
  • : document.layers[floatingMenuId];
  • initSecondary();
  • }
  • var stepX, stepY;
  • floatingMenu.computeShifts();
  • var cornerX = floatingMenu.calculateCornerX();
  • var stepX = (cornerX - floatingMenu.nextX) * .07;
  • if (Math.abs(stepX) < .5)
  • {
  • stepX = cornerX - floatingMenu.nextX;
  • }
  • var cornerY = floatingMenu.calculateCornerY();
  • var stepY = (cornerY - floatingMenu.nextY) * .07;
  • if (Math.abs(stepY) < .5)
  • {
  • stepY = cornerY - floatingMenu.nextY;
  • }
  • if (Math.abs(stepX) > 0 ||
  • Math.abs(stepY) > 0)
  • {
  • floatingMenu.nextX += stepX;
  • floatingMenu.nextY += stepY;
  • floatingMenu.move();
  • }
  • setTimeout('floatingMenu.doFloat()', 20);
  • };
  • // addEvent designed by Aaron Moore
  • floatingMenu.addEvent = function(element, listener, handler)
  • {
  • if(typeof element[listener] != 'function' ||
  • typeof element[listener + '_num'] == 'undefined')
  • {
  • element[listener + '_num'] = 0;
  • if (typeof element[listener] == 'function')
  • {
  • element[listener + 0] = element[listener];
  • element[listener + '_num']++;
  • }
  • element[listener] = function(e)
  • {
  • var r = true;
  • e = (e) ? e : window.event;
  • for(var i = element[listener + '_num'] -1; i >= 0; i--)
  • {
  • if(element[listener + i](e) == false)
  • r = false;
  • }
  • return r;
  • }
  • }
  • //if handler is not already stored, assign it
  • for(var i = 0; i < element[listener + '_num']; i++)
  • if(element[listener + i] == handler)
  • return;
  • element[listener + element[listener + '_num']] = handler;
  • element[listener + '_num']++;
  • };
  • floatingMenu.init = function()
  • {
  • floatingMenu.initSecondary();
  • floatingMenu.doFloat();
  • };
  • // Some browsers init scrollbars only after
  • // full document load.
  • floatingMenu.initSecondary = function()
  • {
  • floatingMenu.computeShifts();
  • floatingMenu.nextX = floatingMenu.calculateCornerX();
  • floatingMenu.nextY = floatingMenu.calculateCornerY();
  • floatingMenu.move();
  • }
  • if (document.layers)
  • floatingMenu.addEvent(window, 'onload', floatingMenu.init);
  • else
  • {
  • floatingMenu.init();
  • floatingMenu.addEvent(window, 'onload',
  • floatingMenu.initSecondary);
  • }
  • //-->
  • </script>

  • Replace allbloggertool1 with your Twitter username.
    PS: If you have already added the Google +1 Button somewhere in your blog then you need to add this code Just above
    </head>

    <script src='http://apis.google.com/js/plusone.js' type='text/javascript'> {lang: &#39;en-US&#39;} </script>

    Now you are done.

    We have great collection of Best tricks and tutorials, Bloggingtrainings.blogpsot.com is a Blog Providing with Blogger widgets, help, blogger tips, blogger tricks, hacks, Blogger Gadgets,Plugins and Blogger resources with great skills and templates.practical SEO Tips and all things Blogging,is about Blog tricks & tips, Traffic generation, Backlinks, Search engine optimization, Web designing, E money, Social media, Facebook tricks,Blogging Discussion, Tips & Tricks,logging tips, tricks, how-tos, news, tools and resources, bloggingtrainings.blogspot presented in easy to understand tutorials.Keep visiting us if any links is not working or you want sme more help, then keep looging at bloggingtrainings.blogspot.com.or contact us 0323-7591466.


    HOW TO CREATE A GOOGLE+ FAN PAGE?

    Google+(Plus) Launches Pages For Google +(Plus). A Businesses solution for Promoting products and sharing news, photos and events, to your customers and Fans. it is very similar to the Facebook Fan Pages. in this Article i show you how to Create and Promote a Fan Page for your Blogger Blog.

    HOW TO CREATE A GOOGLE+ FAN PAGE?

    You Must Have a Google+ Account to create a G+ Fan Page
    1. Go to THIS PAGE and Click on Product or Brand
      How to Create Google+ (Plus) Fan Page for Your Blog
    2. Enter the Blog Title and URL as Follows
      How to Create Google+ (Plus) Fan Page for Your Blog
    3. Select the Category as WebSite
      How to Create Google+ (Plus) Fan Page for Your Blog
    4. Tick the Agree Page Terms check-box and Click on Create Button.
      How to Create Google+ (Plus) Fan Page for Your Blog
    5. Enter the Tagline of the Blog and Upload a Profile photo (if any!)
      How to Create Google+ (Plus) Fan Page for Your Blog
    6. Your G+ page is almost created. if you wish to share your page with your Google+ Circles, then click the Share on Google+ button and Finally Click the Finish button
      How to Create Google+ (Plus) Fan Page for Your Blog

    ADDING OFFICIAL GOOGLE+(PLUS) PAGE BADGE

    To Grow your fans and Audience, add the official Google+ page badge to your blog.
    1. After finishing creating page, you will see the page like below. click the get the Badge link.
      How to Create Google+ (Plus) Fan Page for Your Blog
    2. You will redirect to this page. and your Google + page ID is automatically added.
    3. Choose a Style of Badge and Language (Leave the Advanced options to Default).
    4. Here, you will get Two sections of Code.(Code1 and Code2).
      How to Create Google+ (Plus) Fan Page for Your Blog
    5. Go to Blogger Dashboard > Design > Edit HTML
    6. Search for the </head> tag
    7. Add the Code1 section before </head> tag and Save the Template
    8. Add the Code2 section in HTML/JavaScript gadget or place where you want the badge to be appear.

    Smooth Jquery Scroll to Top widget generator for Blogger , bloggingtrainings.blogspot.com

    15+ Scroll To top buttons Widget Generator

    Select Button

    General Options
    Button Size :
    Position :
    Include jQuery Plugin(Do you want to add it?) :
       

    How to add Google +1 button and Badge for Blogger


    Google's new GPlus +1 button for blogger,that lets to share your blog with like minded people across the world. Blogger introduces two Google+ gadgets (+1 Button and Google+ Badge) .Google+ button is almost same as Facebook Like button.Unlike the Google+ button appears below the post,the gadget is specific to your blog.Google+ gadget allows your visitors to recommend your blog and able to share on their circles.
    Here i am going to show how to add this gadgets.. 


    • Sig in to your Blogger
    • Go to Layout and click Add Gadget
      
    Google +1 button and Badge 
    • Take +1 button or Google+ Badge as you need
    • If you take Google+ badge give page ID
    Google +1 button and Badge

    •   Thats all....
    A lot of other tips and tricks like how to add more blogger widgets, add social book marking baar, add new sidebar, add facebook lik box , post google adse inside or below the post title , google adse between post,Horizontal manu bar for blogger, image slider for blogger.Please keep wathcing www.bloggingtrainings.blogspot.com flash for blogger templates, and a lot of other tricks for blogger users. 

    Facebook jQuery POP OUT likebox widget generator,blogging tricks

    I had developed a Facebook Static popout jquery effect Like box generator for you.This Widget Generator let's you easily generaate your favorite Facebook style Widget and also easily add to your Blogger Blog.In my previous Article (How to Add a Static Facebook jQuery Pop out Widget) I told you about Static Facebook POP OUT Widget installation manually.Use this Widget generator and Enjoy..!


    Step 1: Add jQuery plugin (if your blog have a jquery plugin,ignore this step)
    • Go to Design->Edit HTML[Template->Edit HTML in new blogger interface]
    • Copy below code inside <head>
    <script src='http://ajax.googleapis.com/ajax/libs/jquery/1.7.1/jquery.min.js' type='text/javascript'/>
    • Go to Design-> Page Elements
    • Click add gadget and select HTML/javascript
    • Copy and paste the generated code inside it and save it.


    a lot of other tips and tricks like how to add more blogger widgets, add social book marking baar, add new sidebar, add facebook lik box , post google adse inside or below the post title , google adse between post,Horizontal manu bar for blogger, image slider for blogger.Please keep wathcing www.bloggingtrainings.blogspot.com flash for blogger templates, and a lot of other tricks for blogger users. 

    How to Add a Stylish Flash Animated Clock to your Blogger

    Here I am saying about How to Add a Stylish Flash Animated Clock to your Blogger Blog.Here is a huge collection of Clock widgets for your taste.Follow the Simple Steps below to make your Blog Stylish,Cool, and Smart looking Blog.


    • First of all SignIn to your Blogger Account 
    • Select Design->Page Elements
    • Click on Add Gadget
    • Select HTML/javascript from it,then copy the code of clock you want.
     

      Step 1: If you want a NON Static Clock Widget,then Just copy and paste the code to HTML/javascript content.

      If you want a cool static clock,then first do the step above and Click HERE

      Add Stylish Flash Clock 1


      • If you want to add this Clock,then Copy  and paste the below code
      <div class="noop-clock"><center><embed height="140" src="http://www.hitarek.com/clock/clock24-6.swf?TimeZone=IST&amp;Place=&amp;" type="application/x-shockwave-flash" width="210"></embed></center><center><a style="font-size: 3mm" target="_blank" href="http://www.hitarek.com">Free Clock</a></center></div>

      Add Stylish Flash Clock 2


      • If you want to add this Clock,then Copy  and paste the below code
      <div class="noop-clock"><center><!-- hitarek.com --><embed width="210" src="http://www.hitarek.com/clock/clock24-2.swf?TimeZone=IST&Place=&" height="140"  type="application/x-shockwave-flash"></embed></center><center><a style="font-size: 3mm" target="_blank" href="http://www.hitarek.com">Free Clock</a></center></div>

      Add Stylish Flash Clock 3


      • If you want to add this Clock,then Copy  and paste the below code
      <div class="noop-clock"><center><!-- hitarek.com --><embed width="120" src="http://www.hitarek.com/clock/clock5-1.swf?TimeZone=IST&Place=&" height="230" wmode="transparent" type="application/x-shockwave-flash"></embed></center><center><a style="font-size: 3mm" target="_blank" href="http://www.hitarek.com">Free Clock</a></center></div>

      Add Stylish Flash Clock4


      • If you want to add this Clock,then Copy  and paste the below code
      <div class="noop-clock"><center><embed height="230" src="http://www.hitarek.com/clock/clock5-2.swf?TimeZone=IST&amp;Place=&amp;" type="application/x-shockwave-flash" width="120" wmode="transparent"></embed></center><center><a style="font-size: 3mm" target="_blank" href="http://www.hitarek.com">Free Clock</a></center></div>

      Add Stylish Flash Clock4


      • If you want to add this Clock,then Copy  and paste the below code
      <div class="noop-clock">
      <center><iframe allowtransparency="true" frameborder="0" height="148" hspace="0" marginheight="0" marginwidth="0" scrolling="no" src="http://www.hitarek.com/animation/dolls5.html" vspace="0" width="100"></iframe></center><center><a href="http://netoopsblog.blogspot.com/" style="font-size: 2mm;" target="_blank">FreeWidgets</a></center></div><center><a style="font-size: 3mm" target="_blank" href="http://www.hitarek.com">Free Clock</a></center>

       
      Support : Creating Website | Johny Template | Mas Template
      Copyright © 2011. Blogging Trainings - All Rights Reserved
      Template Created by Creating Website Published by Mas Template
      Proudly powered by Blogger