Latest Movie :
Recent Tricks
Showing posts with label Blogging Trainings. Show all posts

SEO TRICKS FOR BLOGGERS BEAUTIFUL

blogger seo settings


Its big, its exciting and its worth an applause! Blogger finally introducedthe most awaited SEO features for Google hosted BlogSpot blogs. Blogger Team is trying every possible effort to get closer to its biggest competitor Wordpress in terms of development. Its believed that BlogSpot blogs are not well optimized due to limited Search Engine optimization features but with the introduction of Meta Description for individual posts, custom redirection for broken links, nofollow attribute, 404 error pages, custom robots.txt and robot header tagsfeatures, blogger surprised almost everyone today. The problem of wrong post description appearing in social networks like Facebook and Google+ will all be solved thanks to Meta Tags for posts and pages. We will look into each feature one by one so that you may understand clearly the importance of these technical SEO terms.

What are the new Search Features?

Six important SEO options have been added to Blogger in draft which are:
  1. Meta Tags for Homepage and Sub-pages
  2. 404 Error Page
  3. Custom Redirects for broken links
  4. Custom Robots.txt         For Advanced users
  5. Custom robots header tags     For Advanced users
  6. Nofollow attribute for post Editor links
Caution: Out of six new features only two which relate to crawling and indexing of search robots are restricted for Advanced users. I would therefore recommend not to play with them because wrong settings can terribly effect search credibility of your blog therefore keep them as default.
To set the new SEO settings do this:
  1. Go To draft.blogger.com
  2. Then Go to Settings > Search preferences
search preferences
Now here you will see three important sub-sections which we will discuss one by one.

Meta Tags

The word meta here refers to Meta Description. It tells visitors what your blog is all about. In search engine results page it looks like this:
meta description for homepage
Previously we would manually set meta description for blog homepage but now you can set it using this page. So what's new? The new addition is that by enabling this feature, metadescription for Posts will activate and you can then configure Description for posts using the blog post editor. To activate this option do this:
  1. Click the Edit link
  2. Choose "Enable Search Description?"
  3. In box define your blog in no more than 150 characters. Use our Character Counter Tool
Note: You must write the same description here that you have written manually inside your templates.
meta description
      4.   Click Save changes
     5.   Since the above description wont work correctly in custom templates therefore we need to insert some code inside the template. Please go to Design > Edit HTML   and just below <head>  paste the following code for meta description:
<b:if cond='data:blog.metaDescription != &quot;&quot;'>
  <meta expr:content='data:blog.metaDescription' name='description'/>
</b:if> 
        6.   Save your template and all done!
Meta Description For Posts
Now open Blogger post editor and you will see a new option for post description:
post description in blogger
Now make it your hobby to write a one line description for every post that you publish. Write no more than 150 characters  or 15 keyword phrases. By doing this every new post that you publish will have a separate clean description that will attract more visitors by providing precise description of what you post is all about instead of a chopped random  snippet of text chosen by search robot. This will help both robots in better indexing your posts and also Facebook and Google+ to display correct description for your posts.

Errors and redirections

Most of you know that Google webmasters give you several links which are either broken or no more exits. Broken links refer to Pages that no more exits on your blog because for some reason you may have deleted them. Now if some website is linking one of your posts that you deleted then you wont get the reward of the PageRank juice from that website to yours instead if people click that link they will land no where in your blog and will see a 404 Page not found error. There was no concept of a 404 error page before instead this page would appear:
 blogger page not found
But now you can create your own custom 404 error page. Check ours by writing anything illogical at the end of our blog URL in your address bar or simply click here
404 error page blogger
Therefore in order to redirect deleted post links to new links and create a custom 404 Error page do this:
404 Error Page
  1. Click the Edit link next to Custom Page Not Found
  2. Inside the box write a message that you want to display when readers land on a missing page (404 page):
404 error page
You can write any message inside this box using simple HTML but once you click save changes and see how your error page looks, you will see that it looks dull and grey and appear inside an ugly box. In order to give it a good designed look with custom CSS styles just like ours then kindly wait for my next post.
Broken Link Redirection
custom redirects in blogger
  1. Click the edit link next to Custom Redirects
  2. Click the  checkbox to simplify the options
  3. Now you get a From and To input options
  4. Insert the link of your deleted Post inside From box and insert the link of your new post inside To box.
  5. Click Save changes
You can create several redirects by clicking the New redirect button. If you are confused where to redirect a deleted page or post then you can simply redirect all broken links to your Homepage in order to flow all PageRank juice there.

Crawlers and indexing

Do not worry, its not that advanced and horrifying! :)
This section includes two options which are robots.txt and robot header tags. You may not touch the robots.txt option however you can manage settings for robot header  tags  severed to search engines. All our long techy SEO tutorials that provided solution for optimizing Blogger pages, posts, homepage, archive and search pages can now be implemented with a simple click of a mouse.
The robots meta tag lets you control how an individual page should be indexed and served to users in search results. In order to keep things simple use the following settings as shown in the screenshot below:
robots header tags settings
The above recommended settings will tell search engines to index your homepage and all its content, to index your posts and pages but must not index archives and should also not take description suggestions from Open Directory Project (noopd).
Normally, search engines use resources like the Open Directory Project (noopd) and the Yahoo! Directory (noydir) to find titles and descriptions for your content. Generally, you will not want them to do this. The noodp tag prevents them from doing so.
What does unavailable_after Meta tag does?
Though you wont need them but for understanding we would explain it. Most blogs promote seasonal products by writing posts. If you are promoting a new product offer on monthly basis which would expire the next month then you must tell search spiders to stop indexing the old product posts and index the latest one. This will help spiders to give more importance to your latest posts than old repeated posts.

rel nofollow

To understand what is a nofollow link attribute and when should you use it, then kindly read this tutorial:
  • When should you nofollow an external link?

Internal links should never be tagged as nofollow. See What Matt Cutts recommends

These Contents are taken from myblogger tricks

How to add contact form in blogger blogs easily

you have to only follow these steps to add contact form.
1. Go to Blogger.com → Blog Title → Layout → Add Widget
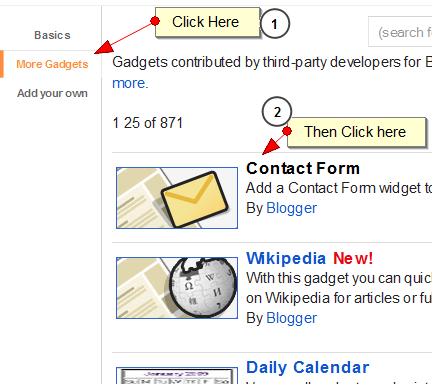
2.  From the tabs menu click on More Gadgets.
3. Now click on Contact Form and finally Give your desired heading to it
4. Save the widget and lastly save the Template


How to add Contact Form


Thats it. Now whenever a visitor wants to contact you he can do the same by just press a single button moreover you can see the messages in your email box. Now there would be no need of 123forms and Foxyforms. This contact form is in its initial stage and we may see further development on it.

I think you found this post useful , if it is then please keep looking in our website www.bloggingtrainings.blogspot.com.

block Adblocker users in your Blogger blog easily

Do you know you to use Ad blocker? What is Ad blocker?Ad-blocker is an extension available on major browsers which blocks the advertisements which appear on Facebook / Google / Youtube and all small and big website/blogs. Ad-blocker currently has millions and millions of users. Bloggers work hard to provide services to their visitors and in return they too should get something and this extension is actually the road block in the path.

Due to Ad-blocker the ads don't reach some of the visitors and thus there would be no money no matter how much large user base you have. So in order to block Ad-blocker users, you just have to add a small piece of code. When any Ad-blocker user visits to your blog he will be redirected to a page which will instruct him/her to disable the extension and visit the page again.

There are many pros and cons of this plugins.

Pros -  

1. You will have more income as ads are visible to all.
2. After adding Ad-blocker the UI of the website changes to an extent. After adding this plugin all can see the actual page.

Cons- 

1. Bounce rate is going to be much higher
2. You may loose visitors.

A bloggers main job is helping others and not making money so I would personally recommend not to use this plugin. But if you think that you are not getting anything for the things you have been providing to your visitors you may add this plugins.


Adding the Ad-blocker Blocker


First go to Blog Title → Template → Edit HTML. Press Ctrl F and search for</body> and paste the given code just above </body>.

<div id="abt-adblock-container">
<script type='text/javascript'>
//<![CDATA[
document.write('<\/SCR'+'IPT>');
//]]>
</script>
</div>
<script type='text/javascript'>
//<![CDATA[
if (document.getElementById("abt-adblock-container").clientHeight < 11 || document.getElementById("abt-adblock-container").style.position == "absolue") {window.location = "http://www.techigeek.com/abt-adblocker-blocker.html";}
//]]>
</script>

After adding the code save the template.

You are done now. Now whenever any Ad-blocker users come to your block he would be forced to disable the extension to see the contents of your blog.We are very thankful to you for visiting our website www.bloggingtrainings.blogspot.com.

How to Backup of your Blogger blogs easily

Backup blogs
To day i will tell you about taking backup of your important and all posts from blogger blog. you can read it step by step.
First of all Happy Diwali to all the readers of All Blogger Tricks. May this Diwali bring lot of brightness and happiness in your life.

Today I am going to tell you how you can easily backup your blogger blogs in 3 different ways. Backing a blog is a thing which must be practiced by every blogger. Though Blogger is owned by Google and is one of the most secured platform and can't be hacked easily still we never know if our password gets stolen or we by mistake delete a post.

A blogger must backup his blog periodically and to make this task easier I am going to tell you how you can do this by 3 different methods. So here they are - 


Method 1 : The Traditional Way


This is certainly the most common method and many of you out here may know it. In this method we Import the blog posts and download the blog's template from Blogger.com itself. A detailed post on the same can be find on the below link which I have wrote earlier.

Read : How to make a Full backup of your Blogger blog

Method 2 : Downloading Data from Google Dashboard


This is probably the easiest method to backup all your blog's template and posts with just few clicks. So to make backup from this method follow the steps below -

1. First of all go to Google Dashboard. You would be asked to login there.

2. After logging in, click "Download Your Data" link which will be on the left sidebar.

3. Click on Create an Archive Button.

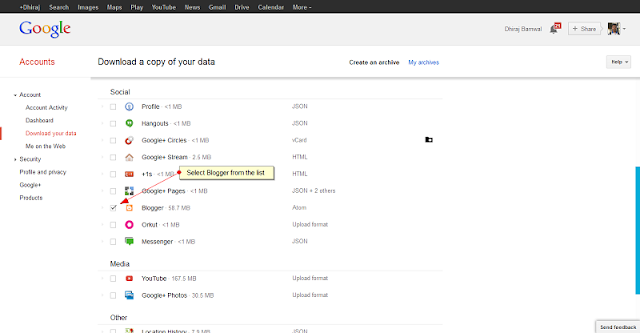
4. A list of many Google Products will come, from the list select Blogger. After Selecting click on the button "Create Archive" which will be at the top of the list.
Backup Blogger  blogs

 5. After clicking a Progress Bar will show the status of your archive being created. After few seconds a download button will appear. Clicking that you will again be prompted to Sign in for security reasons.

6. One you sign in again, you can download the backup of all the blog you have in your blogger account with their template and posts. The backup is now saved in your local disk.

Method 3 : Backup via Software


The third method is also quite easy. In this method we will use a third party software which is Blogger Backup Utility. This software helps you download the posts of your blogger blog (no template backup) easily with the help of the blog's feed. You get various options to workout with the software. To make a backup from Blogger Backup Utility follow the below steps - 

1. Download Blogger Backup Utility from HERE. Extract and Install the Software.

2. From the available blogs dropdown select Add/Update/Remove Blogs option.

3. Enter your Blogger ID and password and wait for the blogs list to be fetched. 

4. Once the process is completed select the desired blog from the dropdown and get a look at the below options such as as save post in individual or single file etc.

Backup blogs software

5.  Lastly click on Backup Posts button and the backup will be saved in the folder selected. Thats it. Your posts are now backed up and saved in your local disk.

We are working hard to provide you your desired instructions and techniques.I hope these methods will help you in making your blog more secure. We are thankful to you for visiting our blog www.bloggingtrainings.blogspot.com.

How to add floating , animated facebook like widget

How to add floating , animated facebook widget in blogger.so this new work is all about social share scrolling buttons widget to your blogger blog. Its very easy to use while adding it to blogger it also more easy just follow the setups the i tell it to you, you will easily get the scrolling social buttons to your blog.

You know that social points to any of the blog is much importance to get better look at natural level its also good for search engine and counted as a positive vote. Search engine bring positive visibility of the page URL which has more social votes to it. So now i am sharing this nice gadget to you that how to add it to blogger. You can also read the post how to add social share icons to blogger in a blogger side column its also useful.

This gadgets look like these.


So here it is how to install it.

  • Go to your blogger dashboard
  • Select your blogger blog
  • Click on Layout from Drop Down menu (shown in picture)

  • A new Window appear
  • Click on Add gadget
  • And select HTML/JavaScript
  • Next Box of HTML/JavaScript will appear (shown in picture)
    

  • Now the box of HTML/JavaScript will appear when you click on the box.
  • Now you have to paste the following code to install the gadget to your blog.
  • Its not so difficult to add just copy it and paste it in the box like shown above.


Adding the code social buttons looks like this 


                Add This Code


Adding the code social buttons looks like this

                                                                                 Add This Code
                                   

I personally added 8 total social network in this gadget you can easily edit them here it is
  • Just remove the line in the code 
  • Like if you want to remove MySpace.com button remove this line from the code
                                <a class="addthis_button_myspace"></a>
These 8 social networks are here
    Facebook.com                        Twitter.com
    Delicious.com                         Pinterest.com
    Digg.com                                Orkut.com
    Googleplus.com                      Myspace.com


    Adding the code social buttons looks like this

                                                                                   Add This Code


    You can also remove or edit the code and here is also 8 networks added just see the above method how to remove the 1 network you just have to remove the line in the code that's it.

    So these are the 3 top gadgets for social share buttons they are the most useful gadget for every blogger blog should add it on their page.

    While adding this gadget is not so difficult its scrolled when the page is scrolled down or up, its bring more social share to the webpage.
    Thanks for watching this, Keep watching our website , www.bloggingtranings.blogspot.com, contact me 0323-7591466.

    Easy ways to make money online with blogs

    Here’s a few proven ways to make money online with blogs
    When you take the time to read all the opinions, it’s clear there are some people who think you can make a lot of money with blogging and others who think it’s just a nice sideline and can’t be monetized properly at all.
    What it all comes down to in the end is the way you use your blogs if you’re looking to line your pockets with cash. Following are a few proven ways that you can make money but be forewarned, regardless of the path you choose it takes a lot of work and there are no guarantees.
    Affiliate Marketing
    Simply put, this is a great way to work on commissions selling someone else’s product or services. One of the prerequisites here is you’ll need to believe in the product or service your standing behind. Of course it’s possible to promote someone else’s goods without really believing in them, but any blogs you write as part of an affiliate marketing campaign will be much more believable when you’re 100% behind what you’re trying to sell.
    The best tone for any kind of text that you use for affiliate marketing is educational. Remember if you try and hit and prospects over the head with a hard sell, they’ll just turn away from what it is you’re trying to get them to buy.  Be aware that there are many other people trying their hand at affiliate marketing at the same time. You’ll need to be able to dig in and work long and hard without immediate returns at first but making money here is a possibility.
    SEO Marketing
    Writing blogs and incorporating links and keywords is another way to make money. Generally there’s no shortage of smaller businesses and their corresponding websites that need this kind of SEO marketing done, but it’s important here that you’re upfront with any clients and let them know right away that a successful campaign takes three or four months to gain traction.
    Of course there are many other paths that you can take when you’re looking to make money blogging. Whichever one you choose, it’s a good idea to keep in mind that you need to write in the active voice to be successful. Remember to take those few extra moments to self edit your blogs. It’s a great idea if you can find another set of eyes to look over your work before you hit the send button as well.

    A lot of other tips and tricks like how to add more blogger widgets, add social book marking baar, add new sidebar, add facebook lik box , post google adse inside or below the post title , google adse between post,Horizontal manu bar for blogger, image slider for blogger, flash for blogger templates, and a lot of other tricks here at www.bloggingtrainings.blogspot.com for blogger users. 

    Add Floating Share Buttons Widget For Blogger Blogspot


    This widget will allow your visitors to share your blog posts on social networks such as google+, facebook, twitter ...

    The design is very attractive widget with animation from top to bottom and encourages readers to share your article easily by clicking on one of these buttons.
    we spend now to install this widget


  • Go To Blogger > Design
  • Choose a HTML/JavaScript widget
  • Paste the following code inside it,
  • <style>
  • /*-------All Blogger Tools------------*/
  • #floatdiv {
  • position:absolute;
  • width:94px;
  • height:229px;
  • top:0;
  • left:0;
  • z-index:100
  • }

  • #mbtsidebar {
  • border:1px solid #ddd;
  • padding-left:5px;
  • position:relative;
  • height:220px;
  • width:55px;
  • margin:0 0 0 5px;
  • }
  • </style>


  • <div id="floatdiv">
  • <div id="mbtsidebar">
  • <table cellpadding="1px" cellspacing="0">
  • <tr>
  • <td style="border-bottom: 1px solid #E8E8E8; padding:5px 0 2px 0;">
  • <div id="fb-root"></div><script src="http://connect.facebook.net/en_US/all.js#xfbml=1"></script><fb:like href="" send="false" layout="box_count" show_faces="false" font=""></fb:like>
  • </td>
  • </tr>
  • <tr>
  • <td style="border-bottom: 1px solid #E8E8E8; padding:5px 0px;">
  • <g:plusone size="Tall" expr:href="data:post.url">
  • </g:plusone></td>
  • </tr>
  • <tr>
  • <td style="border-bottom: 0px solid #E8E8E8; padding:5px 0 0px 0;">
  • <a href="http://twitter.com/share" class="twitter-share-button" data-count="vertical" data-via="allbloggertool1">Tweet</a><script type="text/javascript" src="http://platform.twitter.com/widgets.js"></script>
  • </td>
  • </tr>
  • <tr>
  • <td style="border-bottom: 0px solid #E8E8E8; padding:0px 0 0px 0;">
  • <p style=" font-size:10px; text-align:center; color:#ddd;"><a style="color:#ddd;" href="http://all-blogger-tools.blogspot.com/" target="_blank">Widgets</a></p>
  • </td>
  • </tr>
  • </table>
  • </div>
  • </div>
  • <script type="text/javascript">
  • // JavaScript Document

  • <!--
  • /* Script by: www.jtricks.com
  • * Version: 20071017
  • * Latest version:
  • * www.jtricks.com/javascript/navigation/floating.html
  • */
  • var floatingMenuId = 'floatdiv';
  • var floatingMenu =
  • {
  • targetX: 0,
  • targetY: 300,
  • hasInner: typeof(window.innerWidth) == 'number',
  • hasElement: typeof(document.documentElement) == 'object'
  • && typeof(document.documentElement.clientWidth) == 'number',
  • menu:
  • document.getElementById
  • ? document.getElementById(floatingMenuId)
  • : document.all
  • ? document.all[floatingMenuId]
  • : document.layers[floatingMenuId]
  • };
  • floatingMenu.move = function ()
  • {
  • floatingMenu.menu.style.left = floatingMenu.nextX + 'px';
  • floatingMenu.menu.style.top = floatingMenu.nextY + 'px';
  • }
  • floatingMenu.computeShifts = function ()
  • {
  • var de = document.documentElement;
  • floatingMenu.shiftX =
  • floatingMenu.hasInner
  • ? pageXOffset
  • : floatingMenu.hasElement
  • ? de.scrollLeft
  • : document.body.scrollLeft;
  • if (floatingMenu.targetX < 0)
  • {
  • floatingMenu.shiftX +=
  • floatingMenu.hasElement
  • ? de.clientWidth
  • : document.body.clientWidth;
  • }
  • floatingMenu.shiftY =
  • floatingMenu.hasInner
  • ? pageYOffset
  • : floatingMenu.hasElement
  • ? de.scrollTop
  • : document.body.scrollTop;
  • if (floatingMenu.targetY < 0)
  • {
  • if (floatingMenu.hasElement && floatingMenu.hasInner)
  • {
  • // Handle Opera 8 problems
  • floatingMenu.shiftY +=
  • de.clientHeight > window.innerHeight
  • ? window.innerHeight
  • : de.clientHeight
  • }
  • else
  • {
  • floatingMenu.shiftY +=
  • floatingMenu.hasElement
  • ? de.clientHeight
  • : document.body.clientHeight;
  • }
  • }
  • }
  • floatingMenu.calculateCornerX = function()
  • {
  • if (floatingMenu.targetX != 'center')
  • return floatingMenu.shiftX + floatingMenu.targetX;
  • var width = parseInt(floatingMenu.menu.offsetWidth);
  • var cornerX =
  • floatingMenu.hasElement
  • ? (floatingMenu.hasInner
  • ? pageXOffset
  • : document.documentElement.scrollLeft) +
  • (document.documentElement.clientWidth - width)/2
  • : document.body.scrollLeft +
  • (document.body.clientWidth - width)/2;
  • return cornerX;
  • };
  • floatingMenu.calculateCornerY = function()
  • {
  • if (floatingMenu.targetY != 'center')
  • return floatingMenu.shiftY + floatingMenu.targetY;
  • var height = parseInt(floatingMenu.menu.offsetHeight);
  • // Handle Opera 8 problems
  • var clientHeight =
  • floatingMenu.hasElement && floatingMenu.hasInner
  • && document.documentElement.clientHeight
  • > window.innerHeight
  • ? window.innerHeight
  • : document.documentElement.clientHeight
  • var cornerY =
  • floatingMenu.hasElement
  • ? (floatingMenu.hasInner
  • ? pageYOffset
  • : document.documentElement.scrollTop) +
  • (clientHeight - height)/2
  • : document.body.scrollTop +
  • (document.body.clientHeight - height)/2;
  • return cornerY;
  • };
  • floatingMenu.doFloat = function()
  • {
  • // Check if reference to menu was lost due
  • // to ajax manipuations
  • if (!floatingMenu.menu)
  • {
  • menu = document.getElementById
  • ? document.getElementById(floatingMenuId)
  • : document.all
  • ? document.all[floatingMenuId]
  • : document.layers[floatingMenuId];
  • initSecondary();
  • }
  • var stepX, stepY;
  • floatingMenu.computeShifts();
  • var cornerX = floatingMenu.calculateCornerX();
  • var stepX = (cornerX - floatingMenu.nextX) * .07;
  • if (Math.abs(stepX) < .5)
  • {
  • stepX = cornerX - floatingMenu.nextX;
  • }
  • var cornerY = floatingMenu.calculateCornerY();
  • var stepY = (cornerY - floatingMenu.nextY) * .07;
  • if (Math.abs(stepY) < .5)
  • {
  • stepY = cornerY - floatingMenu.nextY;
  • }
  • if (Math.abs(stepX) > 0 ||
  • Math.abs(stepY) > 0)
  • {
  • floatingMenu.nextX += stepX;
  • floatingMenu.nextY += stepY;
  • floatingMenu.move();
  • }
  • setTimeout('floatingMenu.doFloat()', 20);
  • };
  • // addEvent designed by Aaron Moore
  • floatingMenu.addEvent = function(element, listener, handler)
  • {
  • if(typeof element[listener] != 'function' ||
  • typeof element[listener + '_num'] == 'undefined')
  • {
  • element[listener + '_num'] = 0;
  • if (typeof element[listener] == 'function')
  • {
  • element[listener + 0] = element[listener];
  • element[listener + '_num']++;
  • }
  • element[listener] = function(e)
  • {
  • var r = true;
  • e = (e) ? e : window.event;
  • for(var i = element[listener + '_num'] -1; i >= 0; i--)
  • {
  • if(element[listener + i](e) == false)
  • r = false;
  • }
  • return r;
  • }
  • }
  • //if handler is not already stored, assign it
  • for(var i = 0; i < element[listener + '_num']; i++)
  • if(element[listener + i] == handler)
  • return;
  • element[listener + element[listener + '_num']] = handler;
  • element[listener + '_num']++;
  • };
  • floatingMenu.init = function()
  • {
  • floatingMenu.initSecondary();
  • floatingMenu.doFloat();
  • };
  • // Some browsers init scrollbars only after
  • // full document load.
  • floatingMenu.initSecondary = function()
  • {
  • floatingMenu.computeShifts();
  • floatingMenu.nextX = floatingMenu.calculateCornerX();
  • floatingMenu.nextY = floatingMenu.calculateCornerY();
  • floatingMenu.move();
  • }
  • if (document.layers)
  • floatingMenu.addEvent(window, 'onload', floatingMenu.init);
  • else
  • {
  • floatingMenu.init();
  • floatingMenu.addEvent(window, 'onload',
  • floatingMenu.initSecondary);
  • }
  • //-->
  • </script>

  • Replace allbloggertool1 with your Twitter username.
    PS: If you have already added the Google +1 Button somewhere in your blog then you need to add this code Just above
    </head>

    <script src='http://apis.google.com/js/plusone.js' type='text/javascript'> {lang: &#39;en-US&#39;} </script>

    Now you are done.

    We have great collection of Best tricks and tutorials, Bloggingtrainings.blogpsot.com is a Blog Providing with Blogger widgets, help, blogger tips, blogger tricks, hacks, Blogger Gadgets,Plugins and Blogger resources with great skills and templates.practical SEO Tips and all things Blogging,is about Blog tricks & tips, Traffic generation, Backlinks, Search engine optimization, Web designing, E money, Social media, Facebook tricks,Blogging Discussion, Tips & Tricks,logging tips, tricks, how-tos, news, tools and resources, bloggingtrainings.blogspot presented in easy to understand tutorials.Keep visiting us if any links is not working or you want sme more help, then keep looging at bloggingtrainings.blogspot.com.or contact us 0323-7591466.


    New Like and Send Buttons of facbook for blogger


     Like and Send Buttons


    In this tutorial we will see how to add like and send buttons on your blogger blog.
    This code combined the Like and send button into a single plugin, making it more easy to add both the buttons with a single code.
  • Go To Blogger > Design > Edit HTML
  • Click "Expand widgets templates box"
  • Search for <data:post.body/>
  • and now if you wish to add the plugin just below your post titles then add the giant code below just above <data:post.body/> or if you wish that the plugin may appear at the end of your posts then paste the following code just below <data:post.body/>

  • <div id="fb-root"></div><script src="http://connect.facebook.net/en_US/all.js#xfbml=1"></script><fb:like href="" send="true" layout="button_count" width="450" show_faces="false" font=""></fb:like>

  • Save and you are done.
    We have great collection of Best tricks and tutorials, Bloggingtrainings.blogpsot.com is a Blog Providing with Blogger widgets, help, blogger tips, blogger tricks, hacks, Blogger Gadgets,Plugins and Blogger resources with great skills and templates.practical SEO Tips and all things Blogging,is about Blog tricks & tips, Traffic generation, Backlinks, Search engine optimization, Web designing, E money, Social media, Facebook tricks,Blogging Discussion, Tips & Tricks,logging tips, tricks, how-tos, news, tools and resources, bloggingtrainings.blogspot presented in easy to understand tutorials.Keep visiting us if any links is not working or you want sme more help, then keep looging at bloggingtrainings.blogspot.com.or contact us 0323-7591466.

    Random Posts Widget For Blogger free


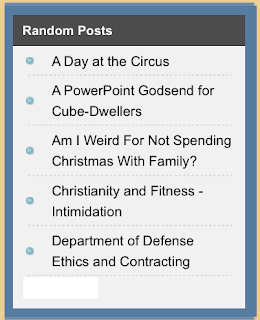
    random posts Random Posts Widget For Blogger
    If you’re using Blogger (blogspot), you can see that there is no random posts widget for Blogger blogs. So I make this widget for this purpose. The widget will show a number of posts (which can be modified) in a random order. This is a good way for Blogger users to suggest more content to visitors.

    To add random posts widget to Blogger, go to “Dashboard” → “Layout”, click on “Add a gatget” and select type HTML/Javascript. Then paste the following code into the widget content:
    1. <div id="random-posts"></div>
    2. <script type='text/javascript'>
    3. function getRandomPosts(json) {
    4. var maxEntries = 10;
    5. var numPosts = json.feed.openSearch$totalResults.$t;
    6. var indexPosts = new Array();
    7. for (var i = 0; i < numPosts; ++i) {
    8. indexPosts[i] = i;
    9. }
    10. indexPosts.sort(function() {return 0.5 - Math.random()});
    11. if (maxEntries > numPosts) {
    12. maxEntries = numPosts;
    13. }
    14. var container = document.getElementById('random-posts');
    15. var ul = document.createElement('ul');
    16. for (i = 0; i < maxEntries; ++i) {
    17. var entry = json.feed.entry[indexPosts[i]];
    18. var li = document.createElement('li');
    19. var a = document.createElement('a');
    20. a.title = entry.title.$t;
    21. for (var j = 0; j < entry.link.length; ++j) {
    22. if (entry.link[j].rel == 'alternate') {
    23. a.href = entry.link[j].href;
    24. break;
    25. }
    26. }
    27. a.appendChild(document.createTextNode(entry.title.$t));
    28. li.appendChild(a);
    29. ul.appendChild(li);
    30. }
    31. container.appendChild(ul);
    32. }
    33. </script>
    34. <script src='/feeds/posts/summary?alt=json-in-script&callback=getRandomPosts&max-results=999999' type='text/javascript'></script>
    To change the number of random posts will be shown, change the value of maxEntries in the 4th line (the default value is 10).
    1. var maxEntries = 10;
    After that, save the widget and refresh your blog, you’ll see the random posts right in your blog.
    We have great collection of Best tricks and tutorials, Bloggingtrainings.blogpsot.com is a Blog Providing with Blogger widgets, help, blogger tips, blogger tricks, hacks, Blogger Gadgets,Plugins and Blogger resources with great skills and templates.practical SEO Tips and all things Blogging,is about Blog tricks & tips, Traffic generation, Backlinks, Search engine optimization, Web designing, E money, Social media, Facebook tricks,Blogging Discussion, Tips & Tricks,logging tips, tricks, how-tos, news, tools and resources, bloggingtrainings.blogspot presented in easy to understand tutorials.Keep visiting us if any links is not working or you want sme more help, then keep looging at bloggingtrainings.blogspot.com.or contact us 0323-7591466.


    Support : Creating Website | Johny Template | Mas Template
    Copyright © 2011. Blogging Trainings - All Rights Reserved
    Template Created by Creating Website Published by Mas Template
    Proudly powered by Blogger