Latest Movie :
Recent Tricks
Showing posts with label Template Editing. Show all posts

Auto Readmore Script Improved for blogger


The auto readmore script is first created by AnhVo at vietwebguide.com (the website is not available now). Based on this idea, I create a new auto readmore script with more options:
  1. Add default thumbnail image when posts don’t have any images.
  2. Option to turn off auto readmore for some first posts.
  3. Option to turn on/off auto readmore for homepage and label page.

How to install

Go to Dashboard → Layout → Edit HTML, check Expand Widget Templates. Find </head> and insert this code before:
  1. <script type="text/javascript">
  2. var summaryConf = {
  3. showImage: true,
  4. imgFloat: 'left',
  5. imgWidth: 120,
  6. imgHeight: 90,
  7. defaultThumb: 'http://rilwis.googlecode.com/svn/trunk/hontap/images/no-thumb.jpg',
  8. words: 65,
  9. wordsNoImg: 80,
  10. skip: 0,
  11. showHome: true,
  12. showLabel: true
  13. };
  14. </script>
  15. <script type="text/javascript" src="http://rilwis.googlecode.com/svn/trunk/blogger/summary.min.js"></script>
After that, find this line in your template:
  1. <data:post.body/>
Replace with:
  1. <span expr:id='data:post.id'><data:post.body/></span>
  2.  
  3. <b:if cond='data:blog.pageType == "index"'>
  4. <script type='text/javascript'>summary("<data:post.id/>")</script>
  5. <b:else/>
  6. <b:if cond='data:blog.pageType == "archive"'>
  7. <script type='text/javascript'>summary("<data:post.id/>")</script>
  8. </b:if>
  9. </b:if>
That’s all! You can refresh your blog and see how it works.

How to change options

The options are very easy to change. It’s declared in the first part of script above. These are their meanings:
showImage: do you want to show thumbnail? If yes, set it true, if no, set it false.
imgFloat: there are 3 values of this option: 'left' – float thumbnail to the left, 'right' – float thumbnail to the right and 'no' – no thumbnail float. Note the quotes around values.
imgWidth and imgHeight: thumbnail size.
defaultThumb: default thumbnail URL, used when posts don’t have any images.
words và wordsNoImg: number of words shown in summary when have thumnail and no thumbnail.
skip: skip some first posts, don’t apply auto readmore for them. If this option is set to 0, all posts are applied auto readmore.
showHome and showLabel: allow or not auto readmore for homepage and label page. true is allowed, false is not.
Adjust these options to fit your blog and enjoy!
We have great collection of Best tricks and tutorials, Bloggingtrainings.blogpsot.com is a Blog Providing with Blogger widgets, help, blogger tips, blogger tricks, hacks, Blogger Gadgets,Plugins and Blogger resources with great skills and templates.practical SEO Tips and all things Blogging,is about Blog tricks & tips, Traffic generation, Backlinks, Search engine optimization, Web designing, E money, Social media, Facebook tricks,Blogging Discussion, Tips & Tricks,logging tips, tricks, how-tos, news, tools and resources, bloggingtrainings.blogspot presented in easy to understand tutorials.Keep visiting us if any links is not working or you want sme more help, then keep looging at bloggingtrainings.blogspot.com.or contact us 0323-7591466.


How To Add Lightbox Effect To Blogger


Lightbox is a simple, unobtrusive script used to overlay images on the current page. The Lightbox effect is useful when your post has many images or images with large sizes, it helps people to save time browsing images in an impressive way. We’ll see how to add Lightbox effect toBlogger (blogspot) blogs.
lightbox How to add Lightbox effect to Blogger
We are going to use the jQuery Lightbox plugin for Blogger. And before going into detail, you might want to see Lightbox in action (click on the image above to enlarge).

How to install

Login to Blogger Dashboard, go to Design, Edit HTML:
Image%2B1 How to add Lightbox effect to Blogger
Add the following code right before the </head> tag:
  1. <link href="http://rilwis.googlecode.com/svn/trunk/blogger/lightbox.css" media="screen" rel="stylesheet" type="text/css" />
  2. <script src="http://ajax.googleapis.com/ajax/libs/jquery/1/jquery.min.js" type="text/javascript"></script>
  3. <script src="http://rilwis.googlecode.com/svn/trunk/blogger/lightbox.min.js" type="text/javascript"></script>
Image%2B2 How to add Lightbox effect to Blogger
This will add the CSS and JS files into your template. These files are hosted in my Google Code project, but you can download them (with links above) and save into your favorite host.

How to use

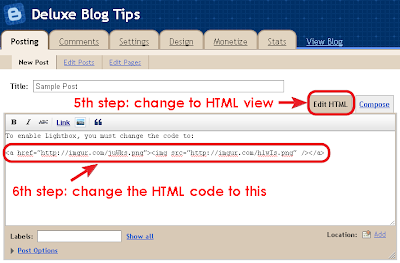
Once you’ve done the installation, whenever you want to add Lightbox effect, switch editor mode to HTML, and wrap the image IMG tag inside a A tag as the following code:
  1. <a href="url of the full-size image"><img src="url of the thumbnail" /></a>
Image%2B4 How to add Lightbox effect to Blogger
Using Lightbox in blog posts is a good way to keep visitors not browsing to other pages for just viewing images. One of other advantages of using Lightbox is that you can use thumbnails in post content instead of full-size images, that reduces total size of page, thus reduces page loading time.
We have great collection of Best tricks and tutorials, Bloggingtrainings.blogpsot.com is a Blog Providing with Blogger widgets, help, blogger tips, blogger tricks, hacks, Blogger Gadgets,Plugins and Blogger resources with great skills and templates.practical SEO Tips and all things Blogging,is about Blog tricks & tips, Traffic generation, Backlinks, Search engine optimization, Web designing, E money, Social media, Facebook tricks,Blogging Discussion, Tips & Tricks,logging tips, tricks, how-tos, news, tools and resources, bloggingtrainings.blogspot presented in easy to understand tutorials.Keep visiting us if any links is not working or you want sme more help, then keep looging at bloggingtrainings.blogspot.com.or contact us 0323-7591466.


Amazing Image Mouse Hover Effects for Blogger

You might have seen a roll over Image effect in many professional and commercial blogs. By roll over I mean that when you hover your mouse cursor on the Image, the image border colour and style/appearance changes. Well using some simple CSS you can add some amazing effects to your Blog Images. Without wasting any time lets jump straight to the steps to be followed.
This tutorial uses a simple pattern for adding codes i.e First you will need to add a CSS code just above ]]></b:skin> and then you will need to add a small HTML code like class="xyz"  to the image code inside your posts. That’s it! :>

First and Foremost See them in action!

How To Add the Top 10 Amazing Image Mouse Hover Effects To Blogger?

To do this follow these steps,
  1. Go to Blogger > Layout > Edit HTML
  2. Search for ]]></b:skin>
  3. And now paste any of your preferred CSS: code just above ]]></b:skin>
Now whenever you write a post, simply upload an image in your blogger Editor and then switch to the Edit HTML mode and search for this code <img and paste the HTML: code of your preferred Image effect just after <img as shown below,
image-hover-effects

Number #1

CSS:
.simple1 {
  padding:5px;
  border:1px solid #ccc;
  }
.simple1:hover {
  padding:5px;
  background-color:#ccc;
  }


HTML:
class="simple1"

Number #2

CSS:
.simple2 {
  padding:5px;
    background-color:#ccc;
border:1px solid #ddd;
  }
.simple2:hover {
  padding:5px;
   background-color:#eee;
border:1px solid #666;
  }


HTML:
class="simple2"

Number #3

CSS:
.black-white {
  padding:5px;
border:1px solid #ccc;
  }
.black-white:hover {
padding:5px;
  background-color:#fff;
border:10px solid #000;
  }


HTML:
class="black-white"

Number #4

CSS:
.dashed {
  padding:5px;
border:1px solid #ccc;
  }
.dashed:hover {
padding:5px;
  background-color:#fff;
border:2px dashed #000;
  }


HTML:
class="dashed"

Number #5

CSS:
.top-bottom {
  padding-top:5px;
  padding-bottom:5px;
border-top:3px solid #ddd;
border-bottom:3px solid #ddd;
  }
.top-bottom:hover {
  background-color:#fff;
border-top:3px solid #000;
border-bottom:3px solid #000;
  }


HTML:
class="top-bottom"

Number #6

CSS:
.curtain {
  padding-top:10px;
  padding-bottom:10px;
border-top:2px solid #ddd;
background-color:#000;
border-bottom:2px solid #ddd;
  }
.curtain:hover {
  background-color:#fff;
border-top:3px solid #000;
border-bottom:3px solid #000;
  }
HTML:
class="curtain"

Number #7

CSS:
.red {
  padding:5px;
border:1px solid #ccc;
  }
.red:hover {
padding:5px;
  background-color:#E71305;
border:10px solid #ddd;
  }
HTML:
class="red"

Number #8

CSS:
.Fadein{
filter:alpha(opacity=100);
-moz-opacity: 1.0;
opacity: 1.0;
border:0;
}
.Fadein:hover{
filter:alpha(opacity=50);
-moz-opacity: 0.30;
opacity: 0.30;
border:0;
}
HTML:
class="Fadein"

Number #9

CSS:
.Fadein2{
filter:alpha(opacity=50);
-moz-opacity: 0.30;
opacity: 0.30;
border:2px solid #000;
}
.Fadein2:hover{
filter:alpha(opacity=100);
-moz-opacity: 1.0;
opacity: 1.0;
border:2px solid #000;
}

HTML:
class="Fadein2"

Number #10

CSS:
.thumbnail{
position: relative;
z-index: 0;
}
.thumbnail:hover{
background-color: transparent;
z-index: 50;
}
.thumbnail span{
position: absolute;
background-color: #7AA1C3;
padding: 0px;
left: -1000px;
border: 1px solid gray;
visibility: hidden;
color: white;
text-decoration: none;
}
.thumbnail span img{
border-width: 0;
padding: 0px;
}
.thumbnail:hover span{
visibility: visible;
top: 0;
left: 5px;
}

HTML: For knowing how to apply this popping effect in detail read this post –> Image Pop-up Effect
<a class="thumbnail" href=""><img src="Add Image URL Here" width="100px" height="100px" border="0px" /><span><img src="Add Image URL Here" /><br /> Image Description here </span></a>

How to Add "Reply Link" to Blogger Comments

Providing your readers with easy navigation and fun-to-use tools should always be your first priority. Whether it may be a video blog like YouTube or it may be any forums, all these great sites have a reply link attached to each comment posted on the site. Fortunately we can even add this extremely useful Reply Link to our blogger blogs to make it even more better. On clicking the reply link or reply button, an anchor link to that comment post is pasted in blogger comment pop-up form. That link will show who has been responded or replied. You can see it working just fine on BT Comments. I am sure you would love to add it to your blogs too. So let's do it!

Add Your Personalized "Reply Link" To Blogger

  1. Go To Blogger > Design > Edit HTML
  2. Backup your template
  3. Click the "Expand widgets Templates" Box
  4. Search For ]]></b:skin>
  5. and paste the code below just above it,
/*--------------MBT Reply Link --------------*/
.MBT-replycomments{
background:#ECEAEA;
cursor:pointer;
color:#fff;
margin:5px 0;
float:right;
border:none;
padding:4px;
-moz-border-radius:6px;
-webkit-border-radius:6px;
border-radius:6px;
font:10px sans-serif;
}
.MBT-replycomments:hover{
background:#E7E7E7;
}


Make these changes:
  • To Change the Link background on active mode edit #ECEAEA
  • To Change the Link Background color on mouse hover edit #E7E7E7
  • Our Color Generator tool will be helpful
    6.    Now Search for,

<dd class='comment-footer'>

and just above it paste the "Reply Link" Code below,

<div class='MBT-replycomments'><a expr:href='&quot;https://www.blogger.com/comment.g?blogID=*******************&amp;postID=&quot; + data:post.id + &quot;&amp;isPopup=true&amp;postBody=%40%3C%61%20%68%72%65%66%3D%22%23&quot; + data:comment.anchorName + &quot;%22%3E&quot; + data:comment.author + &quot;%3C%2F%61%3E#form&quot;' onclick='javascript:window.open(this.href, &quot;bloggerPopup&quot;, &quot;toolbar=0,location=0,statusbar=1,menubar=0,scrollbars=yes,width=650,height=650&quot;); return false;'>Reply..</a></div>

  • You can replace the text Reply.. with anything you like
  • Replace with your BLOG ID. If your are logged into your blogger account then look at your browser address bar. You can clearly see a 18-19 digit code. Just copy it and paste it in place of *******************
blog-id
  7.   Save your template and view your blog comments the WordPress way! :>


We have great collection of Best tricks and tutorials, Bloggingtrainings.blogpsot.com is a Blog Providing with Blogger widgets, help, blogger tips, blogger tricks, hacks, Blogger Gadgets,Plugins and Blogger resources with great skills and templates.practical SEO Tips and all things Blogging,is about Blog tricks & tips, Traffic generation, Backlinks, Search engine optimization, Web designing, E money, Social media, Facebook tricks,Blogging Discussion, Tips & Tricks,logging tips, tricks, how-tos, news, tools and resources, bloggingtrainings.blogspot presented in easy to understand tutorials.Keep visiting us if any links is not working or you want sme more help, then keep looging at bloggingtrainings.blogspot.com.or contact us 0323-7591466.


Create Professional Looking About Us Page


Professional look to your "About Us" webpage should be amongst your first priorities. Visitors have the right to know who you are and what you do and where you belong. Your About Us page is your Identity page where you add a little bio of your self and then explain the purpose of your blog or website. It's the most important page for both your regular visitors and advertisers. So Make sure you leave a good impression on them by presenting your self well. Just an hour ago I designed my personal "About Me" Page and I hope the tutorial today will make sense once you see this new proposed design,

What's New In it?

The Design includes 4 most important features which are:
  1. All Blogger Widgets below Post titles and at the bottom are kept hidden
  2. Three beautiful Rows Describe your Entire Concept of Website i.e 1- Your Bio, 2- Blog Purpose and 3- Concluding paragraph.
  3. Passive Voice Speech is used to make things look professional
  4. It Loads in Seconds
If you think you really need one like that then I am sure you would love to read the tutorial below.

How To Create this About Us page?

For this tutorial I will suggest that you use Windows Live Writer. WLW will make your page design even more neat and clean. So lets get to work!
  1. Copy all data in your about us page in a notepad and keep it safe.
  2. Delete every thing in your about page and start writing a fresh bio about yourself in no more than 3-4 lines. Then add an your best picture to the left of your bio. See the example below,
image
    
3.  Now you need to add some rows/paragraphs where you can talk about your services, goals etc. I would advise that you create at most two-three rows and keep them short in length. Use passive voice and avoid using "I am this and that" rather use a tone that may sound as if someone else is describing the author.  Once you have written down the paragraphs then start enclosing each paragraph one by one between this code,

<div style="border: #686868 5px solid; padding: 10px; -moz-border-radius: 15px; -webkit-border-radius: 15px">
  <div style="text-align: justify"><img style="display: inline; float: right" align="right" src="ADD IMAGE LINK HEREwidth="128" height="128" /></div>
  <div style="text-align: justify"><font color="#666666">
ADD PARAGRAPH TEXT HERE
</font></div>
</div>
<div style="text-align: justify">&#160;</div>

Do it for each paragraph. For example if you have written three paragraphs then enclose them in the codes like this,


<div style="border: #686868 5px solid; padding: 10px; -moz-border-radius: 15px; -webkit-border-radius: 15px">
  <div style="text-align: justify"><img style="display: inline; float: right" align="right" src="ADD IMAGE LINK HEREwidth="128" height="128" /></div>
  <div style="text-align: justify"><font color="#666666">
ADD PARAGRAPH-1 TEXT HERE
</font></div>
</div>
<div style="text-align: justify">&#160;</div>

<div style="border: #686868 5px solid; padding: 10px; -moz-border-radius: 15px; -webkit-border-radius: 15px">
  <div style="text-align: justify"><img style="display: inline; float: right" align="right" src="ADD IMAGE LINK HEREwidth="128" height="128" /></div>
  <div style="text-align: justify"><font color="#666666">
ADD PARAGRAPH-2 TEXT HERE
</font></div>
</div>
<div style="text-align: justify">&#160;</div>

<div style="border: #686868 5px solid; padding: 10px; -moz-border-radius: 15px; -webkit-border-radius: 15px">
  <div style="text-align: justify"><img style="display: inline; float: right" align="right" src="ADD IMAGE LINK HEREwidth="128" height="128" /></div>
  <div style="text-align: justify"><font color="#666666">
ADD PARAGRAPH-3 TEXT HERE
</font></div>
</div>
<div style="text-align: justify">&#160;</div>

Make these changes:
  • To change the border color of the paragraph edit #686868  with your preferred color choice. Use our color generator tool.
  • Replace ADD IMAGE LINK HERE with the URL of your image. Try to you use a small image 128px by 128px in size.
  • To adjust the image size edit width="128" and height="128"
    4.    Finally save your page and publish it. Visit your About Us page to see it in action! :>

Hide Widgets

Now we need to hide all widgets that appear below post titles and at the bottom of posts. These widgets are normally the social bookmarking icons, AdSense code and related post widget which appears on all your posts. To hide them kindly follow these steps,
  1. Go To Blogger > Design > Edit HTML
  2. Backup your template
  3. Check the "Expand Widget Templates" box
  4. Search for ,
<data:post.body/>

and ust above it enclose all your widget codes between the code below,
<b:if cond='data:blog.url != "ADD YOUR ABOUT US PAGE URL HERE"'>
WIDGET CODES
</b:if>

Add all your widget codes between these two bolded lines. Replace ADD YOUR ABOUT US PAGE URL HERE with your About Us page link.
    5. Do the same for all the widget codes below <data:post.body>
    6. Finally save your template and visit your blog to see the page loading in seconds with a neat and clean look.

Need Help?

If you needed any help just feel free to post your queries. I will reply the earliest possible. I just hope you succeed in creating an attention seeking About Us page that may let your blog stand out! Have fun. :>
We have great collection of Best tricks and tutorials, Bloggingtrainings.blogpsot.com is a Blog Providing with Blogger widgets, help, blogger tips, blogger tricks, hacks, Blogger Gadgets,Plugins and Blogger resources with great skills and templates.practical SEO Tips and all things Blogging,is about Blog tricks & tips, Traffic generation, Backlinks, Search engine optimization, Web designing, E money, Social media, Facebook tricks,Blogging Discussion, Tips & Tricks,logging tips, tricks, how-tos, news, tools and resources, bloggingtrainings.blogspot presented in easy to understand tutorials.Keep visiting us if any links is not working or you want sme more help, then keep looging at bloggingtrainings.blogspot.com.or contact us 0323-7591466.


Support : Creating Website | Johny Template | Mas Template
Copyright © 2011. Blogging Trainings - All Rights Reserved
Template Created by Creating Website Published by Mas Template
Proudly powered by Blogger