Latest Movie :
Recent Tricks
Showing posts with label Blogging Tricks. Show all posts

How to add floating , animated facebook like widget

How to add floating , animated facebook widget in blogger.so this new work is all about social share scrolling buttons widget to your blogger blog. Its very easy to use while adding it to blogger it also more easy just follow the setups the i tell it to you, you will easily get the scrolling social buttons to your blog.

You know that social points to any of the blog is much importance to get better look at natural level its also good for search engine and counted as a positive vote. Search engine bring positive visibility of the page URL which has more social votes to it. So now i am sharing this nice gadget to you that how to add it to blogger. You can also read the post how to add social share icons to blogger in a blogger side column its also useful.

This gadgets look like these.


So here it is how to install it.

  • Go to your blogger dashboard
  • Select your blogger blog
  • Click on Layout from Drop Down menu (shown in picture)

  • A new Window appear
  • Click on Add gadget
  • And select HTML/JavaScript
  • Next Box of HTML/JavaScript will appear (shown in picture)
    

  • Now the box of HTML/JavaScript will appear when you click on the box.
  • Now you have to paste the following code to install the gadget to your blog.
  • Its not so difficult to add just copy it and paste it in the box like shown above.


Adding the code social buttons looks like this 


                Add This Code


Adding the code social buttons looks like this

                                                                                 Add This Code
                                   

I personally added 8 total social network in this gadget you can easily edit them here it is
  • Just remove the line in the code 
  • Like if you want to remove MySpace.com button remove this line from the code
                                <a class="addthis_button_myspace"></a>
These 8 social networks are here
    Facebook.com                        Twitter.com
    Delicious.com                         Pinterest.com
    Digg.com                                Orkut.com
    Googleplus.com                      Myspace.com


    Adding the code social buttons looks like this

                                                                                   Add This Code


    You can also remove or edit the code and here is also 8 networks added just see the above method how to remove the 1 network you just have to remove the line in the code that's it.

    So these are the 3 top gadgets for social share buttons they are the most useful gadget for every blogger blog should add it on their page.

    While adding this gadget is not so difficult its scrolled when the page is scrolled down or up, its bring more social share to the webpage.
    Thanks for watching this, Keep watching our website , www.bloggingtranings.blogspot.com, contact me 0323-7591466.

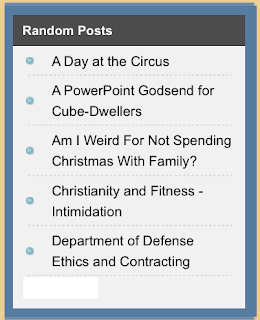
    Random Posts Widget For Blogger free


    random posts Random Posts Widget For Blogger
    If you’re using Blogger (blogspot), you can see that there is no random posts widget for Blogger blogs. So I make this widget for this purpose. The widget will show a number of posts (which can be modified) in a random order. This is a good way for Blogger users to suggest more content to visitors.

    To add random posts widget to Blogger, go to “Dashboard” → “Layout”, click on “Add a gatget” and select type HTML/Javascript. Then paste the following code into the widget content:
    1. <div id="random-posts"></div>
    2. <script type='text/javascript'>
    3. function getRandomPosts(json) {
    4. var maxEntries = 10;
    5. var numPosts = json.feed.openSearch$totalResults.$t;
    6. var indexPosts = new Array();
    7. for (var i = 0; i < numPosts; ++i) {
    8. indexPosts[i] = i;
    9. }
    10. indexPosts.sort(function() {return 0.5 - Math.random()});
    11. if (maxEntries > numPosts) {
    12. maxEntries = numPosts;
    13. }
    14. var container = document.getElementById('random-posts');
    15. var ul = document.createElement('ul');
    16. for (i = 0; i < maxEntries; ++i) {
    17. var entry = json.feed.entry[indexPosts[i]];
    18. var li = document.createElement('li');
    19. var a = document.createElement('a');
    20. a.title = entry.title.$t;
    21. for (var j = 0; j < entry.link.length; ++j) {
    22. if (entry.link[j].rel == 'alternate') {
    23. a.href = entry.link[j].href;
    24. break;
    25. }
    26. }
    27. a.appendChild(document.createTextNode(entry.title.$t));
    28. li.appendChild(a);
    29. ul.appendChild(li);
    30. }
    31. container.appendChild(ul);
    32. }
    33. </script>
    34. <script src='/feeds/posts/summary?alt=json-in-script&callback=getRandomPosts&max-results=999999' type='text/javascript'></script>
    To change the number of random posts will be shown, change the value of maxEntries in the 4th line (the default value is 10).
    1. var maxEntries = 10;
    After that, save the widget and refresh your blog, you’ll see the random posts right in your blog.
    We have great collection of Best tricks and tutorials, Bloggingtrainings.blogpsot.com is a Blog Providing with Blogger widgets, help, blogger tips, blogger tricks, hacks, Blogger Gadgets,Plugins and Blogger resources with great skills and templates.practical SEO Tips and all things Blogging,is about Blog tricks & tips, Traffic generation, Backlinks, Search engine optimization, Web designing, E money, Social media, Facebook tricks,Blogging Discussion, Tips & Tricks,logging tips, tricks, how-tos, news, tools and resources, bloggingtrainings.blogspot presented in easy to understand tutorials.Keep visiting us if any links is not working or you want sme more help, then keep looging at bloggingtrainings.blogspot.com.or contact us 0323-7591466.


    Install Syntax Highligher In Blogger


    syntax highlighter Howto Install SyntaxHighligher In Blogger
    SyntaxHighlighter helps a developer/coder to post code snippets online with ease and have it look prettySyntaxHighlighter is developed in Javascript by Alex Gorbatchev. SyntaxHighlighter is the most popular script for syntax highlighting and widely used by many blogs, websites. It has many wonderful features like: view source code in plain text, copy to clipboard, valid XHTML, … SyntaxHighlighter supports many languages and has bunch of themes.

    Install SyntaxHighlighter In Blogger

    Installing SyntaxHighlighter In Blogger is easy, just open your template and paste the following code right before the close tag </head>:
    1. <link href="http://alexgorbatchev.com/pub/sh/current/styles/shCore.css" rel="stylesheet" type="text/css"></link>
    2. <link href="http://alexgorbatchev.com/pub/sh/current/styles/shThemeDefault.css" rel="stylesheet" type="text/css"></link>
    3. <script src="http://alexgorbatchev.com/pub/sh/current/scripts/shCore.js" type="text/javascript"></script>
    4. <script src="http://alexgorbatchev.com/pub/sh/current/scripts/shBrushCss.js" type="text/javascript"></script>
    5. <script src="http://alexgorbatchev.com/pub/sh/current/scripts/shBrushJScript.js" type="text/javascript"></script>
    6. <script src="http://alexgorbatchev.com/pub/sh/current/scripts/shBrushPhp.js" type="text/javascript"></script>
    7. <script src="http://alexgorbatchev.com/pub/sh/current/scripts/shBrushXml.js" type="text/javascript"></script>
    8. <script language='javascript'>
    9. SyntaxHighlighter.config.bloggerMode = true;
    10. SyntaxHighlighter.config.clipboardSwf = 'http://alexgorbatchev.com/pub/sh/current/scripts/clipboard.swf';
    11. SyntaxHighlighter.all();
    12. </script>
    SyntaxHighlighter supports many languages, each language has its own javascript file. To install syntax highlighting for more languages, you can view list of supported languages, get the javascript’s file name and include it with the following syntax:
    1. <script src="http://alexgorbatchev.com/pub/sh/current/scripts/LANGUAGE_FILE_NAME.js" type="text/javascript"></script>
    There’re many themes for SyntaxHighlighter, too. To change theme, go to the homepage and get the file name for theme and change this line:
    1. <link href="http://alexgorbatchev.com/pub/sh/current/styles/shThemeDefault.css" rel="stylesheet" type="text/css"></link>
    into:
    1. <link href="http://alexgorbatchev.com/pub/sh/current/styles/THEME_FILE_NAME" rel="stylesheet" type="text/css"></link>

    Howto Use SyntaxHighlighter

    To highlight code, just wrap it into a pre tag with the following syntax:
    1. <pre class="brush: js">
    2. // Your code here
    3. </pre>
    Notice the class="brush: js". It defines the language for syntax highlighting, in this situation: JS – Javascript. To know more about brushes, you can see a list of them on the homepage.
    The second important note is the code inside pre tag must be escaped (< and > must be changed into &lt; and &gt;). There’re many online tools for blogger to do that, one of them is Code Converter.
    Using pre tag is the traditional way. Another way to highlight code is using script tag:
    1. <script type="syntaxhighlighter" class="brush: html"><![CDATA[
    2. // Your code here
    3. ]]></script>
    The benefit of this method is ability to place virtually anything inside the CDATA without having to escape anything, so this allows for a straight ‘cut and paste’ experience from your favorite text editor.
    If you need more information about SyntaxHighlighter or more configuration, please go to thehomepage. You can see SyntaxHighlighter in action here, at Deluxe Blog Tips. It’s really pretty and I’m feel good with it.
    We have great collection of Best tricks and tutorials, Bloggingtrainings.blogpsot.com is a Blog Providing with Blogger widgets, help, blogger tips, blogger tricks, hacks, Blogger Gadgets,Plugins and Blogger resources with great skills and templates.practical SEO Tips and all things Blogging,is about Blog tricks & tips, Traffic generation, Backlinks, Search engine optimization, Web designing, E money, Social media, Facebook tricks,Blogging Discussion, Tips & Tricks,logging tips, tricks, how-tos, news, tools and resources, bloggingtrainings.blogspot presented in easy to understand tutorials.Keep visiting us if any links is not working or you want sme more help, then keep looging at bloggingtrainings.blogspot.com.or contact us 0323-7591466.


    Auto Readmore Script Improved for blogger


    The auto readmore script is first created by AnhVo at vietwebguide.com (the website is not available now). Based on this idea, I create a new auto readmore script with more options:
    1. Add default thumbnail image when posts don’t have any images.
    2. Option to turn off auto readmore for some first posts.
    3. Option to turn on/off auto readmore for homepage and label page.

    How to install

    Go to Dashboard → Layout → Edit HTML, check Expand Widget Templates. Find </head> and insert this code before:
    1. <script type="text/javascript">
    2. var summaryConf = {
    3. showImage: true,
    4. imgFloat: 'left',
    5. imgWidth: 120,
    6. imgHeight: 90,
    7. defaultThumb: 'http://rilwis.googlecode.com/svn/trunk/hontap/images/no-thumb.jpg',
    8. words: 65,
    9. wordsNoImg: 80,
    10. skip: 0,
    11. showHome: true,
    12. showLabel: true
    13. };
    14. </script>
    15. <script type="text/javascript" src="http://rilwis.googlecode.com/svn/trunk/blogger/summary.min.js"></script>
    After that, find this line in your template:
    1. <data:post.body/>
    Replace with:
    1. <span expr:id='data:post.id'><data:post.body/></span>
    2.  
    3. <b:if cond='data:blog.pageType == "index"'>
    4. <script type='text/javascript'>summary("<data:post.id/>")</script>
    5. <b:else/>
    6. <b:if cond='data:blog.pageType == "archive"'>
    7. <script type='text/javascript'>summary("<data:post.id/>")</script>
    8. </b:if>
    9. </b:if>
    That’s all! You can refresh your blog and see how it works.

    How to change options

    The options are very easy to change. It’s declared in the first part of script above. These are their meanings:
    showImage: do you want to show thumbnail? If yes, set it true, if no, set it false.
    imgFloat: there are 3 values of this option: 'left' – float thumbnail to the left, 'right' – float thumbnail to the right and 'no' – no thumbnail float. Note the quotes around values.
    imgWidth and imgHeight: thumbnail size.
    defaultThumb: default thumbnail URL, used when posts don’t have any images.
    words và wordsNoImg: number of words shown in summary when have thumnail and no thumbnail.
    skip: skip some first posts, don’t apply auto readmore for them. If this option is set to 0, all posts are applied auto readmore.
    showHome and showLabel: allow or not auto readmore for homepage and label page. true is allowed, false is not.
    Adjust these options to fit your blog and enjoy!
    We have great collection of Best tricks and tutorials, Bloggingtrainings.blogpsot.com is a Blog Providing with Blogger widgets, help, blogger tips, blogger tricks, hacks, Blogger Gadgets,Plugins and Blogger resources with great skills and templates.practical SEO Tips and all things Blogging,is about Blog tricks & tips, Traffic generation, Backlinks, Search engine optimization, Web designing, E money, Social media, Facebook tricks,Blogging Discussion, Tips & Tricks,logging tips, tricks, how-tos, news, tools and resources, bloggingtrainings.blogspot presented in easy to understand tutorials.Keep visiting us if any links is not working or you want sme more help, then keep looging at bloggingtrainings.blogspot.com.or contact us 0323-7591466.


    How To Add Lightbox Effect To Blogger


    Lightbox is a simple, unobtrusive script used to overlay images on the current page. The Lightbox effect is useful when your post has many images or images with large sizes, it helps people to save time browsing images in an impressive way. We’ll see how to add Lightbox effect toBlogger (blogspot) blogs.
    lightbox How to add Lightbox effect to Blogger
    We are going to use the jQuery Lightbox plugin for Blogger. And before going into detail, you might want to see Lightbox in action (click on the image above to enlarge).

    How to install

    Login to Blogger Dashboard, go to Design, Edit HTML:
    Image%2B1 How to add Lightbox effect to Blogger
    Add the following code right before the </head> tag:
    1. <link href="http://rilwis.googlecode.com/svn/trunk/blogger/lightbox.css" media="screen" rel="stylesheet" type="text/css" />
    2. <script src="http://ajax.googleapis.com/ajax/libs/jquery/1/jquery.min.js" type="text/javascript"></script>
    3. <script src="http://rilwis.googlecode.com/svn/trunk/blogger/lightbox.min.js" type="text/javascript"></script>
    Image%2B2 How to add Lightbox effect to Blogger
    This will add the CSS and JS files into your template. These files are hosted in my Google Code project, but you can download them (with links above) and save into your favorite host.

    How to use

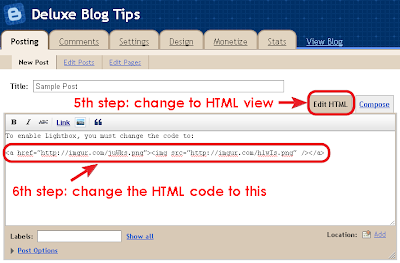
    Once you’ve done the installation, whenever you want to add Lightbox effect, switch editor mode to HTML, and wrap the image IMG tag inside a A tag as the following code:
    1. <a href="url of the full-size image"><img src="url of the thumbnail" /></a>
    Image%2B4 How to add Lightbox effect to Blogger
    Using Lightbox in blog posts is a good way to keep visitors not browsing to other pages for just viewing images. One of other advantages of using Lightbox is that you can use thumbnails in post content instead of full-size images, that reduces total size of page, thus reduces page loading time.
    We have great collection of Best tricks and tutorials, Bloggingtrainings.blogpsot.com is a Blog Providing with Blogger widgets, help, blogger tips, blogger tricks, hacks, Blogger Gadgets,Plugins and Blogger resources with great skills and templates.practical SEO Tips and all things Blogging,is about Blog tricks & tips, Traffic generation, Backlinks, Search engine optimization, Web designing, E money, Social media, Facebook tricks,Blogging Discussion, Tips & Tricks,logging tips, tricks, how-tos, news, tools and resources, bloggingtrainings.blogspot presented in easy to understand tutorials.Keep visiting us if any links is not working or you want sme more help, then keep looging at bloggingtrainings.blogspot.com.or contact us 0323-7591466.


    Support : Creating Website | Johny Template | Mas Template
    Copyright © 2011. Blogging Trainings - All Rights Reserved
    Template Created by Creating Website Published by Mas Template
    Proudly powered by Blogger