You should already know about JQuery Featured Content Slider.Today we will see how to add 17+ jQuery featured content sliders / slideshows for your blog or website.Almost all bloggers use the contents, which included slider.Contents are a great way to show a lot of content in a smaller area of a web page or a blog. Automatic sliding doors are dynamic content in many popular websites on the web.This is a great technique to represent different types of content in a limited space and a good way to involve the user.You have probably noticed that a lot of websites recently a working area with content that slides or changes in any way.
Are you interested in implementing a content slider in your website? Checkout this list!Here I am going to teach you, how to add a featured content slider to your blogger / blogspot blogs.You're not sure what is it exactly? You`ll see below ;)
Featured Content Slider for Blogger Using jQuery

Are you interested in implementing a content slider in your website? Checkout this list!Here I am going to teach you, how to add a featured content slider to your blogger / blogspot blogs.You're not sure what is it exactly? You`ll see below ;)
Featured Content Slider for Blogger Using jQuery
How to Install This Widget on Blogger?
Steps...
A. Adding CSS Theme Code
B. Adding Script Code
C. Adding HTML Code
Adding CSS Theme Code
I have to write two set of instructions for each steps, as some of you are using the default layout, and some of you are using the new layout.Backup your template before attempting this tutorial.
Step 1:
In old layout: Go to Dashboard - Design - Edit HTML - Expand Widget Templates.
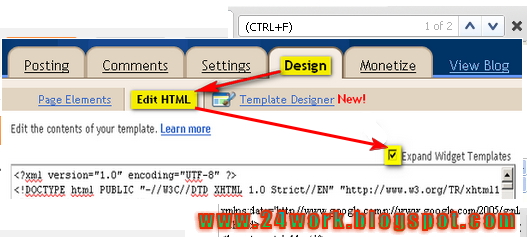
In new layout: Go to Dashboard - Template - Edit Template HTML - Expand Widget Templates.

Now find (CTRL+F) this code in the template:
]]></b:skin>
And immediately before it, paste this code:
#featured{
width:400px;
padding-right:250px;
position:relative;
height:250px;
background:#fff;
border:5px solid #ccc;
}
#featured ul.ui-tabs-nav{
position:absolute;
top:0; left:400px;
list-style:none;
padding:0; margin:0;
width:250px;
}
#featured ul.ui-tabs-nav li{
padding:1px 0; padding-left:13px;
font-size:12px;
color:#666;
}
#featured ul.ui-tabs-nav li span{
font-size:11px; font-family:Verdana;
line-height:18px;
}
#featured .ui-tabs-panel{
width:400px; height:250px;
background:#999; position:relative;
overflow:hidden;
}
#featured .ui-tabs-hide{
display:none;
}
#featured li.ui-tabs-nav-item a{/*On Hover Style*/
display:block;
height:60px;
color:#333; background:#fff;
line-height:20px;
outline:none;
}
#featured li.ui-tabs-nav-item a:hover{
background:#f2f2f2;
}
#featured li.ui-tabs-selected{ /*Selected tab style*/
background:url('selected-item.gif') top left no-repeat;
}
#featured ul.ui-tabs-nav li.ui-tabs-selected a{
background:#ccc;
}
#featured ul.ui-tabs-nav li img{
float:left; margin:2px 5px;
background:#fff;
padding:2px;
border:1px solid #eee;
}
#featured .ui-tabs-panel .info{
position:absolute;
top:180px; left:0;
height:70px; width: 400px;
background: url('transparent-bg.png');
}
#featured .info h2{
font-size:18px; font-family:Georgia, serif;
color:#fff; padding:5px; margin:0;
overflow:hidden;
}
#featured .info p{
margin:0 5px;
font-family:Verdana; font-size:11px;
line-height:15px; color:#f0f0f0;
}
#featured .info a{
text-decoration:none;
color:#fff;
}
#featured .info a:hover{
text-decoration:underline;
}
Adding Script Code
Now find (CTRL+F) this code in the template:
Step 2:And find the code </head>
Step 3: Now add the following code just before the </head> tag.
<a href="http://24work.blogspot.com" target="_blank" title="Blogger Widgets"><img src="http://safir85.ucoz.com/24work-blogspot/cursor-24work-10.png" border="0" alt="Blogger Widgets" style="position:absolute; top: 0px; right: 0px;" /></a><script src='http://safir85.ucoz.com/24work-blogspot/featured-post-s/jquery-1.3.2.min.js' type='text/javascript'/>
<script src='http://safir85.ucoz.com/24work-blogspot/featured-post-s/jquery-1.5.3-ui.min.js' type='text/javascript'/>
<script type='text/javascript'>
$(document).ready(function(){
$("#featured > ul").tabs({fx:{opacity: "toggle"}}).tabs("rotate", 5000, true);
});
</script>
<script src='http://safir85.ucoz.com/24work-blogspot/featured-post-s/jquery-1.5.3-ui.min.js' type='text/javascript'/>
<script type='text/javascript'>
$(document).ready(function(){
$("#featured > ul").tabs({fx:{opacity: "toggle"}}).tabs("rotate", 5000, true);
});
</script>
And now click Save Template
Adding HTML Code
I have to write two set of instructions for each steps, as some of you are using the default layout, and some of you are using the new layout. So, let's see how to install this cool widget in your blog..
Step 4:
If you're using the old Blogger interface: Go to Dashboard - Design - Page Elements - Add a Gadget.

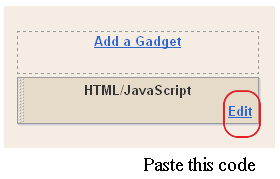

3.Select 'HTML/Javascript' and add the one of code given below
4. Now Click On Save 'JavaScript' You are done.
<div id='featured'>
<ul class='ui-tabs-nav'>
<li class='ui-tabs-nav-item ui-tabs-selected' id='nav-fragment-1'><a href='#fragment-1'><img alt='pic1' src='http://i49.tinypic.com/e1aohv.jpg'/><span>Install Mac OS X on Intel/AMD PC using iATKOS v7</span></a></li>
<li class='ui-tabs-nav-item' id='nav-fragment-2'><a href='#fragment-2'><img alt='blogger' src='http://i438.photobucket.com/albums/qq108/fooble11/image2-small.jpg'/><span>How to remove "showing post with label" in Blogger</span></a></li>
<li class='ui-tabs-nav-item' id='nav-fragment-3'><a href='#fragment-3'><img alt='buzz' src='http://i438.photobucket.com/albums/qq108/fooble11/new1.jpg'/><span>How to add Google Buzz to Blogspot blog</span></a></li>
<li class='ui-tabs-nav-item' id='nav-fragment-4'><a href='#fragment-4'><img alt='chat' src='http://i50.tinypic.com/34xfg4m.jpg'/><span>Chat live with your blog visitors using Yahoo Pingbox</span></a></li>
</ul>
<!-- First Content -->
<div class='ui-tabs-panel' id='fragment-1' style=''>
<img alt='mac' src='http://i47.tinypic.com/rsbi80.jpg'/>
<div class='info'>
<h3><a href='#'>Install Mac OS X on Intel/AMD PC using iATKOS v7</a></h3>
<p>Description goes here, this is just a test description....<a href='http://bdlab.blogspot.com/'>read more</a></p>
</div>
</div>
<!-- Second Content -->
<div class='ui-tabs-panel ui-tabs-hide' id='fragment-2' style=''>
<img alt='' src='http://i50.tinypic.com/33kprh5.jpg'/>
<div class='info'>
<h3><a href='#'>How to remove "showing post with label" in Blogger</a></h3>
<p>Description goes here, this is just a test description....<a href='#'>read more</a></p>
</div>
</div>
<!-- Third Content -->
<div class='ui-tabs-panel ui-tabs-hide' id='fragment-3' style=''>
<img alt='' src='http://i47.tinypic.com/2191lqt.jpg'/>
<div class='info'>
<h3><a href='#'>How to add Google Buzz to Blogspot blog</a></h3>
<p>Description goes here, this is just a test description....<a href='#'>read more</a></p>
</div>
</div>
<!-- Fourth Content -->
<div class='ui-tabs-panel ui-tabs-hide' id='fragment-4' style=''>
<img alt='' src='http://i48.tinypic.com/10pwp3o.jpg'/>
<div class='info'>
<h3><a href='#'>Chat live with your blog visitors using yahoo</a></h3>
<p>Description goes here, this is just a test description....<a href='#'>read more</a></p>
</div>
</div> </div>
And now click Save


Post a Comment
PLEASE DON'T PLACE BULK MESSAGE , FOR ADVERTISING!