Simple jQuery Featured Content Slider for Blogger Blog
How to Install This Widget on Blogger?
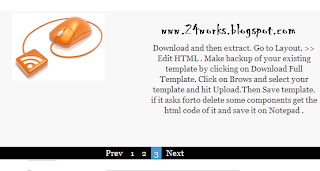
Steps...
A. Adding CSS Theme Code
B. Adding Script Code
C. Adding HTML Code
Adding CSS Theme Code
In old layout: Go to Dashboard - Design - Edit HTML - Expand Widget Templates.
In new layout: Go to Dashboard - Template - Edit Template HTML - Expand Widget Templates.
Now find (CTRL+F) this code in the template:
]]></b:skin>
And immediately before it, paste this code:
#jFlowSlide{ background:#f8f8f8; font-family: Georgia; }
#myController { font-family: Georgia; padding:2px 0; width:610px; background:#000000; }
#myController span.jFlowSelected { background:#43A0D5;margin-right:0px; }
.slide-wrapper { padding: 5px; }
.slide-thumbnail { width:300px; float:left; }
.slide-thumbnail img {max-width:300px; }
.slide-details { width:290px; float:right; margin-left:10px;}
.slide-details h2 { font-size:1.5em; font-style: italic; font-weight:normal; line-height: 1; margin:0; }
.slide-details .description { margin-top:10px; }
.jFlowControl, .jFlowPrev, .jFlowNext { color:#FFF; cursor:pointer; padding-left:5px; padding-right:5px; padding-top:2px; padding-bottom:2px; }
.jFlowControl:hover, .jFlowPrev:hover, .jFlowNext:hover { background: #43A0D5; }
Adding Script Code
Now find (CTRL+F) this code in the template:
Step 2:And find the code </head>
Step 3: Now add the following code just before the </head> tag.
<a href="http://24work.blogspot.com" target="_blank" title="Blogger Widgets"><img src="http://safir85.ucoz.com/24work-blogspot/cursor-24work-10.png" border="0" alt="Blogger Widgets" style="position:absolute; top: 0px; right: 0px;" /></a><script language='javascript' src='http://safir85.ucoz.com/24work-blogspot/featured-post-s/jquery-0-1.min.js' type='text/javascript'/>
<script language='javascript' src='http://safir85.ucoz.com/24work-blogspot/featured-post-s/freebloggerhelp-jquery.flow.1.2.auto.js' type='text/javascript'/>
<script type='text/javascript'>
$(document).ready(function(){
$("#myController").jFlow({
slides: "#slides",
controller: ".jFlowControl", // must be class, use . sign
slideWrapper : "#jFlowSlide", // must be id, use # sign
selectedWrapper: "jFlowSelected", // just pure text, no sign
auto: true, //auto change slide, default true
width: "610px",
height: "235px",
duration: 100,
prev: ".jFlowPrev", // must be class, use . sign
next: ".jFlowNext" // must be class, use . sign
});
});
</script>
And now click Save Template
Adding HTML Code
So, let's see how to install this cool widget in your blog..
1. Sign into Blogger dashboard
old Blogger interface: Go to Dashboard - Design - Page Elements - Add a Gadget.If you're using the new Blogger interface: Go to Dashboard - Layout - Add a Gadget.Select 'HTML/Javascript' and add the one of code given below.Just copy and paste this code..
<div class="jflow-content-slider">
<div id="slides">
<-! Slide #1 Starts-->
<div class="slide-wrapper">
<div class="slide-thumbnail">
<img alt="" src="IMAGE-LINK"/>
</div>
<div class="slide-details">
<span style="font-size: large;"><b> TITLE-OF-THE-SLIDE </b></span>
<div class="description">
TEXT-OF-THE-SLIDE
</div>
</div>
<div class="clear"></div>
</div>
<!-- Slide # 1 Ends -->
<-! Slide #2 Starts-->
<div class="slide-wrapper">
<div class="slide-thumbnail">
<img alt="" src="IMAGE-LINK"/>
</div>
<div class="slide-details">
<span style="font-size: large;"><b> TITLE-OF-THE-SLIDE </b></span>
<div class="description">
TEXT-OF-THE-SLIDE
</div>
</div>
<div class="clear"></div>
</div>
<!-- Slide # 2 Ends -->
<-! Slide #3 Starts-->
<div class="slide-wrapper">
<div class="slide-thumbnail">
<img alt="" src="IMAGE-LINK"/>
</div>
<div class="slide-details">
<span style="font-size: large;"><b> TITLE-OF-THE-SLIDE </b></span>
<div class="description">
TEXT-OF-THE-SLIDE
</div>
</div>
<div class="clear"></div>
</div>
<!-- Slide # 3 Ends -->
<!-- You can add as many slides as you want above this line -->
</div>
<div id="myController">
<span class="jFlowPrev">Prev</span>
<span class="jFlowControl">1</span>
<span class="jFlowControl">2</span>
<span class="jFlowControl">3</span>
<!-- Increase these numbers as with the increase in your number of slides above -->
<span class="jFlowNext">Next</span>
</div>
<div class="clear"></div>
</div>
And now click Save
t's Done.
Customization
Code 1. You can change the background colors in code 1 to suit your blog.
Code 2. First of all download http://safir85.ucoz.com/24work-blogspot/featured-post-s/freebloggerhelp-jquery.flow.1.2.auto.js and upload it to google sites.
You can change width, height and duration speed.
Code 3. As you look on code 3 there are 3 slide codes. First give the image link, add title and finally add description. Do same with all three codes. You can add more slide by adding the code:
<div class="slide-wrapper">
<div class="slide-thumbnail">
<img alt="" src="IMAGE-LINK"/>
</div>
<div class="slide-details">
<span style="font-size: large;"><b> TITLE-OF-THE-SLIDE </b></span>
<div class="description">
TEXT-OF-THE-SLIDE
</div>
</div>
<div class="clear"></div>
</div>
<div class="slide-thumbnail">
<img alt="" src="IMAGE-LINK"/>
</div>
<div class="slide-details">
<span style="font-size: large;"><b> TITLE-OF-THE-SLIDE </b></span>
<div class="description">
TEXT-OF-THE-SLIDE
</div>
</div>
<div class="clear"></div>
</div>
Also you have to add
4
after
3
and so on for next slides.


Post a Comment
PLEASE DON'T PLACE BULK MESSAGE , FOR ADVERTISING!