Latest Movie :
Recent Tricks

How To Add Lightbox Effect To Blogger


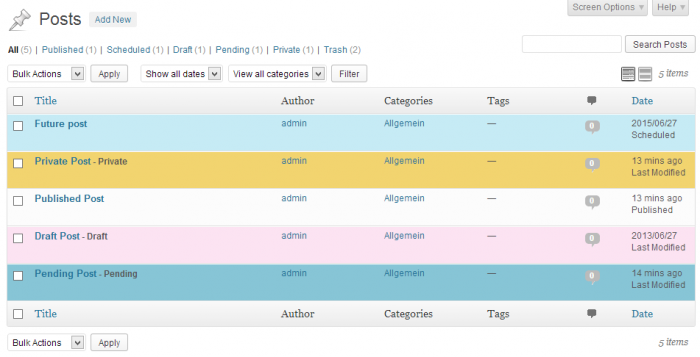
Lightbox is a simple, unobtrusive script used to overlay images on the current page. The Lightbox effect is useful when your post has many images or images with large sizes, it helps people to save time browsing images in an impressive way. We’ll see how to add Lightbox effect toBlogger (blogspot) blogs.
lightbox How to add Lightbox effect to Blogger
We are going to use the jQuery Lightbox plugin for Blogger. And before going into detail, you might want to see Lightbox in action (click on the image above to enlarge).

How to install

Login to Blogger Dashboard, go to Design, Edit HTML:
Image%2B1 How to add Lightbox effect to Blogger
Add the following code right before the </head> tag:
  1. <link href="http://rilwis.googlecode.com/svn/trunk/blogger/lightbox.css" media="screen" rel="stylesheet" type="text/css" />
  2. <script src="http://ajax.googleapis.com/ajax/libs/jquery/1/jquery.min.js" type="text/javascript"></script>
  3. <script src="http://rilwis.googlecode.com/svn/trunk/blogger/lightbox.min.js" type="text/javascript"></script>
Image%2B2 How to add Lightbox effect to Blogger
This will add the CSS and JS files into your template. These files are hosted in my Google Code project, but you can download them (with links above) and save into your favorite host.

How to use

Once you’ve done the installation, whenever you want to add Lightbox effect, switch editor mode to HTML, and wrap the image IMG tag inside a A tag as the following code:
  1. <a href="url of the full-size image"><img src="url of the thumbnail" /></a>
Image%2B4 How to add Lightbox effect to Blogger
Using Lightbox in blog posts is a good way to keep visitors not browsing to other pages for just viewing images. One of other advantages of using Lightbox is that you can use thumbnails in post content instead of full-size images, that reduces total size of page, thus reduces page loading time.
We have great collection of Best tricks and tutorials, Bloggingtrainings.blogpsot.com is a Blog Providing with Blogger widgets, help, blogger tips, blogger tricks, hacks, Blogger Gadgets,Plugins and Blogger resources with great skills and templates.practical SEO Tips and all things Blogging,is about Blog tricks & tips, Traffic generation, Backlinks, Search engine optimization, Web designing, E money, Social media, Facebook tricks,Blogging Discussion, Tips & Tricks,logging tips, tricks, how-tos, news, tools and resources, bloggingtrainings.blogspot presented in easy to understand tutorials.Keep visiting us if any links is not working or you want sme more help, then keep looging at bloggingtrainings.blogspot.com.or contact us 0323-7591466.


What’s your best writing technique?


It all comes down to the same end result (words on the screen and ultimately in a blog) but there are many different paths to that mountaintop. Some writers like to write early in the morning or late at night, while other scribes can only do the work necessary for their blogs in the basement or in the backroom on the first floor of their homes.
Regardless of how you personalize the process, there are some techniques that have been around long enough to be called traditions. Check out a few of these below but feel free to add you own additions.
  1. Write the first draft all the way through. You’ve got a great idea and as soon as you start writing, your thoughts meander because there was something else you’ve just thought about to make that opening sentence really sing. Make a note in the margin or write something down in a notebook, but don’t stop. A good thought usually translates onto the screen from beginning to end. If you stop to revise along the way, you stand a chance of having the whole thing dissolve and be lost for good.
  2. Take breaks. I’ve read lots about burnout and mental fatigue and it is the lot of the writer that doesn’t understand you need to take breaks to recharge the batteries. One of the best pieces of advice (and one I hardly ever follow) is to take a ten minute break every hour. It works wonders to clear you head but is harder than hell to stick to if you’ve got deadlines and time allotments for your working day.
  3. Learn to rely on self editing. After that first draft is done, you can go back and start to edit words or phases to give the text more clarity and meaning. That generally means looking for words that can be cut without changing the meaning of the sentence. When you start asking yourself how you can say the same thing with fewer words and self edit accordingly, you’ll be surprised at how much better the text sounds.
You can pile you own individual writing techniques on top of these suggestions. Why not share a few right here so your fellow writers can get some insight into what works best for their colleagues?
We have great collection of Best tricks and tutorials, Bloggingtrainings.blogpsot.com is a Blog Providing with Blogger widgets, help, blogger tips, blogger tricks, hacks, Blogger Gadgets,Plugins and Blogger resources with great skills and templates.practical SEO Tips and all things Blogging,is about Blog tricks & tips, Traffic generation, Backlinks, Search engine optimization, Web designing, E money, Social media, Facebook tricks,Blogging Discussion, Tips & Tricks,logging tips, tricks, how-tos, news, tools and resources, bloggingtrainings.blogspot presented in easy to understand tutorials.Keep visiting us if any links is not working or you want sme more help, then keep looging at bloggingtrainings.blogspot.com.or contact us 0323-7591466.

How to Makes A Good Domain?


Screen Shot 2013-08-05 at 10.09.21 AM
The domain name for your website is going to be the first thing that your visitors see. Whether they are typing it into their address bar or they are choosing it from a search engine, they are going to see it before they see the actual website. This means that it needs to be good. It cannot be just anything, especially when you consider how a poor choice can affect traffic. You want to make sure that more and more people are choosing you over the competition. You want your name to be something that is memorable and gives information. With a little creativity and thinking, you can find something incredible.
What To Name Your Domain
For the most part, a good domain name is something that is short, memorable, and gives people information about you. It needs to be unique to your business and / or site and it needs to be something that people will remember. You also want it to be short and simple. When people see your address, they should be attracted to it in some way. They should be able to remember it long after they have already seen it. Try to use your business name or specific information about your website’s content. Make sure that it is appealing and straightforward, and that it cannot be confused with anything else.
Register Your Domain
Once you have something figured out, you are going to need to know how to get a domain name. Registering for one is not difficult, but you should first look into the name’s availability. There are plenty of tools available to help you do this, and they are incredible effective. They are going to search for the domain that you want and seek out available alternatives if it is taken. This will help you to have what you want and it will give you the chance to see availability as quickly as possible.
The best place to register domain names is out there. You just have to know what you are after if you plan to look into this. You will be able to find various places that offer domain names at affordable prices so look into what is out there. Whether you want a .com or a .net, or anything else possible, you should know what you are after and you should have a budget in mind. While they are not going to be the most expensive part of the website, you are still going to want to save as much as possible with this.
Choosing A Great Domain
Having a good domain name is very possible. You just need to make sure that it suits you and that it is something that will appeal to people. It should be memorable and simple, all while giving possible visitors an idea of you. This will help to bring in as many people as possible. After having it figured out, finding the best place to register domain is the next step. You should look into what you need and what is available then compare before you buy.

We have great collection of Best tricks and tutorials, Bloggingtrainings.blogpsot.com is a Blog Providing with Blogger widgets, help, blogger tips, blogger tricks, hacks, Blogger Gadgets,Plugins and Blogger resources with great skills and templates.practical SEO Tips and all things Blogging,is about Blog tricks & tips, Traffic generation, Backlinks, Search engine optimization, Web designing, E money, Social media, Facebook tricks,Blogging Discussion, Tips & Tricks,logging tips, tricks, how-tos, news, tools and resources, bloggingtrainings.blogspot presented in easy to understand tutorials.Keep visiting us if any links is not working or you want sme more help, then keep looging at bloggingtrainings.blogspot.com.or contact us 0323-7591466.


Colorize Your Posts in the WP Dashboard According to Their Status


The best thing about using WordPress  is that you’re able to do anything by adding a new plugin.
You could make your WP admin dashboard look better, more modern and have a flat design better than the ugly default one. You could also speed up your WP blog.
Another thing you could do is colorize your posts in the WP dashboard according to their status.
One of the things I struggle with is looking for drafts for my coming guest posts between my published posts.
I always love to create more than a guest post at a time. That’s why I struggle a lot to find the guest post that I need.
I searched for a lot of time to find a solution for this problem and make things more cleaner, and I came to an awesome plugin that made my life easier. It’s a really amazing and simple to use plugin.
If you love organizing things and keeping them arranged, you will like this plugin.
Continue reading to know this plugin and how easy you could use this plugin.

Colored Admin Post List

This is the plugin that I use to make my dashboard looks better.
With this plugin, you could easily change the background of your post according to their status. You could change it whether they are draft, pending, private or published posts.
The plugin is really useful especially for multi-author blogs which have more and more content created every day.
Here’s a screenshot of a WP blog dashboard using the plugin:
Pretty awesome, right?
The best thing about the plugin is you could use the color palette, so it could fit your needs. Change them until you could find the scheme that best fit your needs.
Here’s a screenshot of the settings page to know how easy and quick it is to choose your own colors:

How to install the colored admin post list plugin?

You could install the colored admin post list plugin as any other plugin out there.
You could search for the plugin in your dashboard and install it from there.
You could also download it from here and then upload it in plugins page.
Or you could download it, unzip it, and then add the folder in your plugins folder using FileZilla.
It’s that simple. Nothing new.
Go and try using the colored admin post list plugin and see what happens.

Last Words:

The plugin is really amazing and it saves a lot of time especially for multi-author blogs like Blogging Tips.
Why don’t you try the colored admin post list plugin and see the difference yourself. I’m sure you’re going to love it.
Tell me, if you have used the colored admin post list plugin in the comments. What do you think about it?
Do you use any other plugin that you think is better than this plugin?
Share your thoughts in the comments, I’ll love to respond to all of you.
We have great collection of Best tricks and tutorials, Bloggingtrainings.blogpsot.com is a Blog Providing with Blogger widgets, help, blogger tips, blogger tricks, hacks, Blogger Gadgets,Plugins and Blogger resources with great skills and templates.practical SEO Tips and all things Blogging,is about Blog tricks & tips, Traffic generation, Backlinks, Search engine optimization, Web designing, E money, Social media, Facebook tricks,Blogging Discussion, Tips & Tricks,logging tips, tricks, how-tos, news, tools and resources, bloggingtrainings.blogspot presented in easy to understand tutorials.Keep visiting us if any links is not working or you want sme more help, then keep looging at bloggingtrainings.blogspot.com.or contact us 0323-7591466.


How Email Marketing Made Easy with iContact


Yesterday, I did a write-up on PRWeb and how that service can allow businesses of all sizes to distribute their press releases to all sorts of news organizations. This can really help to generate some buzz and increase visibility, but how do you retain those contacts? There’s a reason why so many Internet marketers will tell you that the power is in the list… but how do you manage that list?
Another product from Vocus approaches that exact situation and it’s called iContact. If you’re looking for an award-winning email marketing provider that can help you grow your business, then iContact could be a suitable partner for you.

iContact You by Email and Social Media

Email marketing is definitely on the rise and it is definitely a big focus for iContact, but it’s important to note that the company also provides other services and products too. For instance, you get social media marketing by way of Facebook and Twitter, complete with social media tracking and sign-up forms.
icontact1
But yes, email marketing is the primary focus. Everyone has an email address and it is a technology that has managed to survive the quickly evolving nature of the Internet. Social media sites may come and go, RSS may or may not be as relevant, but everyone still uses email. And iContact is designed to handle all your email marketing needs, including the management of your email list.

Hundreds of Email Templates

It’s not just about managing the list, of course, because you want your e-mail blasts to be opened, read and acted upon. iContact works hard to ensure that your messages really do make it to the inboxes of your subscribers, working with a team of delivery specialists and SpamCheck. They’ve built close relationships with major ISPs to help get past spam filters too.
icontact2
Once you get into the inbox, you’ll want your newsletter or mailouts to be aesthetically pleasing. Thankfully, just like how WordPress themes make designing a blog easy for even a novice, iContact offers hundreds of email templates that you can then customize with your branding and color scheme. There are tons of different layouts, so whether you like postcard style, one-column or multi-column formats, they’ll have something for you.
The professional templates are on the same level as what you’d find used by major companies like Amazon. This adds to the professionalism and legitimacy of your own business.
Even if you have no design experience at all, you can use the MessageBuilder tool offered by iContact to create your own “beautiful messages in minutes.” The message creation tool is completely drag-and-drop, so you don’t need to have any knowledge of HTML or complex coding. You can then add your own colors, images, links and text. If you prefer hard code, iContact’s MessageCoder tool can import HTML from your favorite template too.

Plans that Grow with Your Business

As with other email marketing solutions out there, iContact by Vocus bases its monthly pricing plans on the number of subscribers that you have.
icontact3
The three main plans shown here start at $14.00 per month for up to 500 subscribers, ramping up to $47.00 a month for up to 5,000 subscribers. In all, there are actually seven different plans, starting as low as $10/month for 250 subscribers and growing to $109/month for 15,000 subscribers. This way, as your list grows, you can upgrade your plan accordingly. If you prepay annually instead of paying each month, you’ll also get a 15% discount.
If you’re not sure if you want to use iContact for your email marketing needs, the good news is that you can take it out for a test drive with the free trial first.
We have great collection of Best tricks and tutorials, Bloggingtrainings.blogpsot.com is a Blog Providing with Blogger widgets, help, blogger tips, blogger tricks, hacks, Blogger Gadgets,Plugins and Blogger resources with great skills and templates.practical SEO Tips and all things Blogging,is about Blog tricks & tips, Traffic generation, Backlinks, Search engine optimization, Web designing, E money, Social media, Facebook tricks,Blogging Discussion, Tips & Tricks,logging tips, tricks, how-tos, news, tools and resources, bloggingtrainings.blogspot presented in easy to understand tutorials.Keep visiting us if any links is not working or you want sme more help, then keep looging at bloggingtrainings.blogspot.com.or contact us 0323-7591466.

Use Social Media to Create a Successful Blog


Are you searching for effective ways to grow your online audience while increasing your blog traffic? Social media is an efficient tool for promoting your blog and making it popular among your target audience. Businesses have successfully extended their blog’s reach using social media sites such as YouTube, LinkedIn, Pinterst, Google+, and of course Facebook and Twitter.
Social Media Networks

9 Tips for Using Social Media to Successfully Promote Your Blog

Let’s take a look at our Top 9 Tips for Promoting Your Blog Using Social Media:
Post to Social Media Profiles Using Feed Tools
Twitterfeed, and various other feed tools give you the ability to publish links to your blog posts on multiple social media sites automatically. If your blog is running on the WordPress platform, you’ll find some really great plug-ins that help you automate this process.
Automate Your Publishing
Imagine how simpler your blogging life would be if you could automate your posts. Well, using tools like HootSuite, SproutSocial and TweetDeck, you can. Simply schedule your posts for the entire day, week or even month ahead. This is a great way for busy business owners to get the word out about new posts quickly and simply. Scheduling allows you to spread your posts out, while simultaneously posting to various social media profiles.
Add Icons on Your Blog for Quick Social Media Sharing, Tweeting and Liking
No matter which blogging platform you use, your sidebar should contain social network icons. Why? These icons allow your readers to quickly connect with you via your social network profiles, with just one click. They also encourage your audience to share, like and tweet about your blog or any of its contents.
Link Your Blog and Social Media Profiles to Each Other
Social Media NetworksEvery single one of your social network profiles should include the URL of your blog. That way, no matter where your audience is connecting to you from, your blog is only a simple click away.
Your Forum Signatures Should Contain the URL of Your Blog
When you post relevant, valuable information, questions or comments in industry-related forums, you increase your web presence. Including a link to your blog in forum signatures helps to create backlinks to your blog, which helps to increase blog traffic.
Comments Made on Other Blog Should Contain Your Blog’s URL
Leaving or responding to comments on other relevant blogs also increases your web presence among your target audience. Add a link to your blog within your comments to create valuable backlinks. This also increases the chances of that audience visiting your blog using a single click.
Utilize the Social Media Widgets and Tools Offered
Most of the popular social media networks offer free widgets and tools to promote user profiles. These can be added to your blog to increase your content’s exposure. Simply log into your social media profiles, access these features, and add them to your blog.
We have great collection of Best tricks and tutorials, Bloggingtrainings.blogpsot.com is a Blog Providing with Blogger widgets, help, blogger tips, blogger tricks, hacks, Blogger Gadgets,Plugins and Blogger resources with great skills and templates.practical SEO Tips and all things Blogging,is about Blog tricks & tips, Traffic generation, Backlinks, Search engine optimization, Web designing, E money, Social media, Facebook tricks,Blogging Discussion, Tips & Tricks,logging tips, tricks, how-tos, news, tools and resources, bloggingtrainings.blogspot presented in easy to understand tutorials.Keep visiting us if any links is not working or you want sme more help, then keep looging at bloggingtrainings.blogspot.com.or contact us 0323-7591466.


Amazing Image Mouse Hover Effects for Blogger

You might have seen a roll over Image effect in many professional and commercial blogs. By roll over I mean that when you hover your mouse cursor on the Image, the image border colour and style/appearance changes. Well using some simple CSS you can add some amazing effects to your Blog Images. Without wasting any time lets jump straight to the steps to be followed.
This tutorial uses a simple pattern for adding codes i.e First you will need to add a CSS code just above ]]></b:skin> and then you will need to add a small HTML code like class="xyz"  to the image code inside your posts. That’s it! :>

First and Foremost See them in action!

How To Add the Top 10 Amazing Image Mouse Hover Effects To Blogger?

To do this follow these steps,
  1. Go to Blogger > Layout > Edit HTML
  2. Search for ]]></b:skin>
  3. And now paste any of your preferred CSS: code just above ]]></b:skin>
Now whenever you write a post, simply upload an image in your blogger Editor and then switch to the Edit HTML mode and search for this code <img and paste the HTML: code of your preferred Image effect just after <img as shown below,
image-hover-effects

Number #1

CSS:
.simple1 {
  padding:5px;
  border:1px solid #ccc;
  }
.simple1:hover {
  padding:5px;
  background-color:#ccc;
  }


HTML:
class="simple1"

Number #2

CSS:
.simple2 {
  padding:5px;
    background-color:#ccc;
border:1px solid #ddd;
  }
.simple2:hover {
  padding:5px;
   background-color:#eee;
border:1px solid #666;
  }


HTML:
class="simple2"

Number #3

CSS:
.black-white {
  padding:5px;
border:1px solid #ccc;
  }
.black-white:hover {
padding:5px;
  background-color:#fff;
border:10px solid #000;
  }


HTML:
class="black-white"

Number #4

CSS:
.dashed {
  padding:5px;
border:1px solid #ccc;
  }
.dashed:hover {
padding:5px;
  background-color:#fff;
border:2px dashed #000;
  }


HTML:
class="dashed"

Number #5

CSS:
.top-bottom {
  padding-top:5px;
  padding-bottom:5px;
border-top:3px solid #ddd;
border-bottom:3px solid #ddd;
  }
.top-bottom:hover {
  background-color:#fff;
border-top:3px solid #000;
border-bottom:3px solid #000;
  }


HTML:
class="top-bottom"

Number #6

CSS:
.curtain {
  padding-top:10px;
  padding-bottom:10px;
border-top:2px solid #ddd;
background-color:#000;
border-bottom:2px solid #ddd;
  }
.curtain:hover {
  background-color:#fff;
border-top:3px solid #000;
border-bottom:3px solid #000;
  }
HTML:
class="curtain"

Number #7

CSS:
.red {
  padding:5px;
border:1px solid #ccc;
  }
.red:hover {
padding:5px;
  background-color:#E71305;
border:10px solid #ddd;
  }
HTML:
class="red"

Number #8

CSS:
.Fadein{
filter:alpha(opacity=100);
-moz-opacity: 1.0;
opacity: 1.0;
border:0;
}
.Fadein:hover{
filter:alpha(opacity=50);
-moz-opacity: 0.30;
opacity: 0.30;
border:0;
}
HTML:
class="Fadein"

Number #9

CSS:
.Fadein2{
filter:alpha(opacity=50);
-moz-opacity: 0.30;
opacity: 0.30;
border:2px solid #000;
}
.Fadein2:hover{
filter:alpha(opacity=100);
-moz-opacity: 1.0;
opacity: 1.0;
border:2px solid #000;
}

HTML:
class="Fadein2"

Number #10

CSS:
.thumbnail{
position: relative;
z-index: 0;
}
.thumbnail:hover{
background-color: transparent;
z-index: 50;
}
.thumbnail span{
position: absolute;
background-color: #7AA1C3;
padding: 0px;
left: -1000px;
border: 1px solid gray;
visibility: hidden;
color: white;
text-decoration: none;
}
.thumbnail span img{
border-width: 0;
padding: 0px;
}
.thumbnail:hover span{
visibility: visible;
top: 0;
left: 5px;
}

HTML: For knowing how to apply this popping effect in detail read this post –> Image Pop-up Effect
<a class="thumbnail" href=""><img src="Add Image URL Here" width="100px" height="100px" border="0px" /><span><img src="Add Image URL Here" /><br /> Image Description here </span></a>

Fade Effect with Clickable Images In Blogger


Most of you requested a tutorial on how to make images clickable in blogger posts, sidebars and footers so the tutorial today will not only teach you that but will also share the beautiful trick of adding the fading effect to the images i.e. the images will fade on mouse hover. So lets get things done!
CLICKABLE-IMAGE


How to make an image clickable?

The complete clickable image code looks like this,

<a href="LANDING URL" target="_blank"><img src="IMAGE LINK" width="" height=""  alt=""  title="" border="0" /></a>


  • Where refers to where will the image take the user when it is clicked.
  • Where IMAGE LINK refers to the URL of your picture
  • width="" and height="" has to be given proper values in pixels
  • alt="" is alternative text tag that you right to tell search engine robots what the image is about
  • title="" is the name of the image that appears on mouse hover. It is always kept the same as the alt=""
  • border="0" ensures that no border or outline appears across the image
For example for the image below I have used the following code,


<a href="http://www.mybloggertricks.com" target="_blank"><img src="IMAGE LINK" width="240px" height="180px"  alt="Clickable Koala image" title="Clickable Koala image" border="0" /></a>
  
                                               CLICKABLE-IMAGE


When you click the image, it will take you to our homepage. Else if you want to link to the original size of image then use this code,


How to make the same image un-clickable?

To make any image un-clickable simply remove the href linking tag. After removing the landing address tag we get,

<img src="IMAGE LINK" width="" height=""  alt=""  title="" border="0" />

You will see that the image is no more clickable. and the code I used this time is the same one but without the href tag,

<img src="IMAGE LINK" width="240px" height="180px"  alt="unclickable Koala image" title="unclickable Koala image" border="0" />


How to make an image fade in and fade out?

For this you will need to add a tiny CSS3 code to your template. So kindly follow these steps,
  1. Go To Blogger> Design > Edit HTML
  2. Backup your template
  3. Search for ]]></b:skin>
  4. Add the code below just above it
/*---MBT FADE OUT CODE ----*/
.Fadeout img {
filter:alpha(opacity=100);
opacity: 0.3;
border:0;
}
.Fadeout:hover img {
filter:alpha(opacity=30);
opacity:1.0;
border:0;
}
/*---MBT FADE IN CODE ----*/
.Fadein img {
filter:alpha(opacity=30);
opacity: 1.0;
border:0;
}
.Fadein:hover img {
filter:alpha(opacity=100);
opacity:0.3;
border:0;


 5.  Save your template.

Now whenever you wish to add the fading effect to your image then simply insert an additional code to the same Clickable image code that we discussed above.

To make the image Fade out simply insert 
class="Fadeout" to your image code like this,


<a class="Fadeout" href="LANDING URL" target="_blank"><img src="IMAGE LINK" width="" height=""  alt=""  title="" border="0" /></a>

See an example below. (Hover your mouse cursor on it)
Koala fade out

To make the image Fade in simply insert class="Fadein" to your image code like this,

<a class="Fadein" href="LANDING URL" target="_blank"><img src="IMAGE LINK" width="" height=""  alt=""  title="" border="0" /></a>


See an example,
Koala fade in


I hope you find it useful. If you wanted to know where to save your images or to get IMAGE Links then read this post,


Support : Creating Website | Johny Template | Mas Template
Copyright © 2011. Blogging Trainings - All Rights Reserved
Template Created by Creating Website Published by Mas Template
Proudly powered by Blogger